> ## Documentation Index
> Fetch the complete documentation index at: https://help.revenuehero.io/llms.txt
> Use this file to discover all available pages before exploring further.
# How to add a RevenueHero booking button in Salesforce?
> Add a custom button to your Salesforce Contact records so reps can book and relay meetings without leaving the CRM.
When your team runs on a custom Sales Cloud app, the RevenueHero Chrome Extension doesn't always surface a booking entry point on every Contact layout. Reps end up copying an email, switching tabs, and pasting it into a booking link. On a busy day that friction is enough to skip the follow-up entirely. We saw this firsthand on customer setup calls: SDRs wanted to hand a prospect to an AE in the two or three seconds they had on a live call, straight from the Contact record they were already looking at.
A custom Salesforce button fixes that. It sits on the Contact page, passes the contact's email into the booking flow for you, and opens the RevenueHero Relay popup using your existing routing rules. This guide covers the admin setup (the button) and the one step each rep needs to do (the extension).
**BEFORE YOU BEGIN**
1. You need Salesforce admin access to **Setup → Object Manager** and **Lightning App Builder**.
2. Your RevenueHero [Relay](/routers/relays/create-relays) router should already be configured, so the popup has routing rules to act on.
3. Confirm your [Salesforce CRM integration](/crm/salesforce/overview) is connected.
## How the booking button works
Two pieces work together. Miss either one and the popup won't open correctly.
1. **The Salesforce button (admin sets this up once).** A custom Detail Page button on the Contact layout opens the RevenueHero booking interface and passes the contact's email as a merge field. That email is what keeps Relay routing and booking attribution accurate.
2. **The Chrome Extension (each rep installs it once).** The button hands off to the extension, which authenticates the rep and renders the Relay booking experience inside Salesforce. If a rep hasn't installed the extension and isn't logged in to RevenueHero, the popup can't initialize.
RevenueHero works out of the box on standard Salesforce layouts. If your org uses custom layouts to match how your team works, set up the RevenueHero button described in this guide so reps can book and hand off meetings directly from those records.
## Part 1: Set up the Salesforce button
### Step 1: Create the custom button
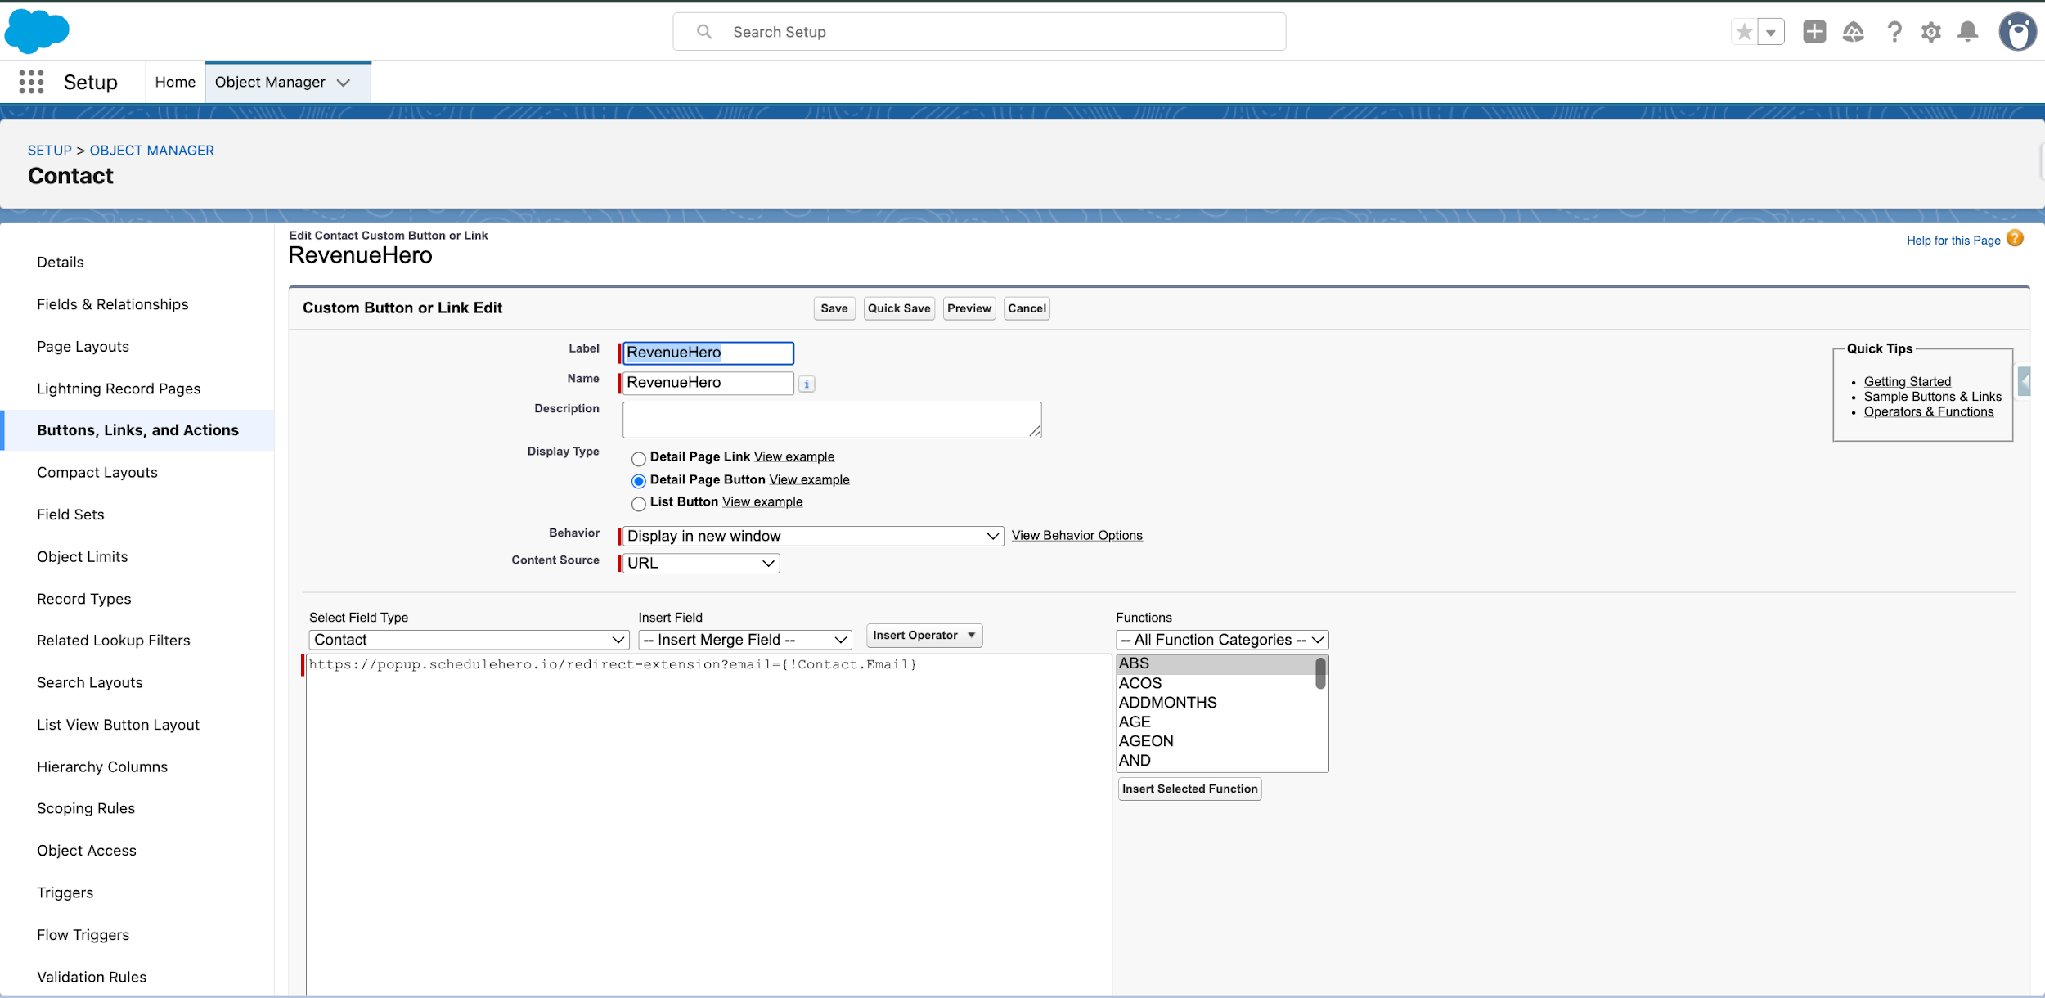
1. In Salesforce, go to **Setup → Object Manager → Contact → Buttons, Links, and Actions**.
2. Click **New Button or Link**.
3. Configure it as follows:
* **Label**: `RevenueHero` (or `Book a Meeting`)
* **Display Type**: **Detail Page Button**
* **Behavior**: **Display in new window**
* **Content Source**: **URL**
4. Enter this URL as the content source:
```text theme={null}
https://popup.schedulehero.io/redirect-extension?email={!Contact.Email}
```
The `{!Contact.Email}` merge field passes the contact's email into the booking flow at click time. This is what lets Relay match the right rep and keep booking attribution tied to the correct contact, so don't remove it.
 ### Step 2: Add the button to the page layout
A button that exists but isn't on the layout never shows up on the record. Place it where reps will see it.
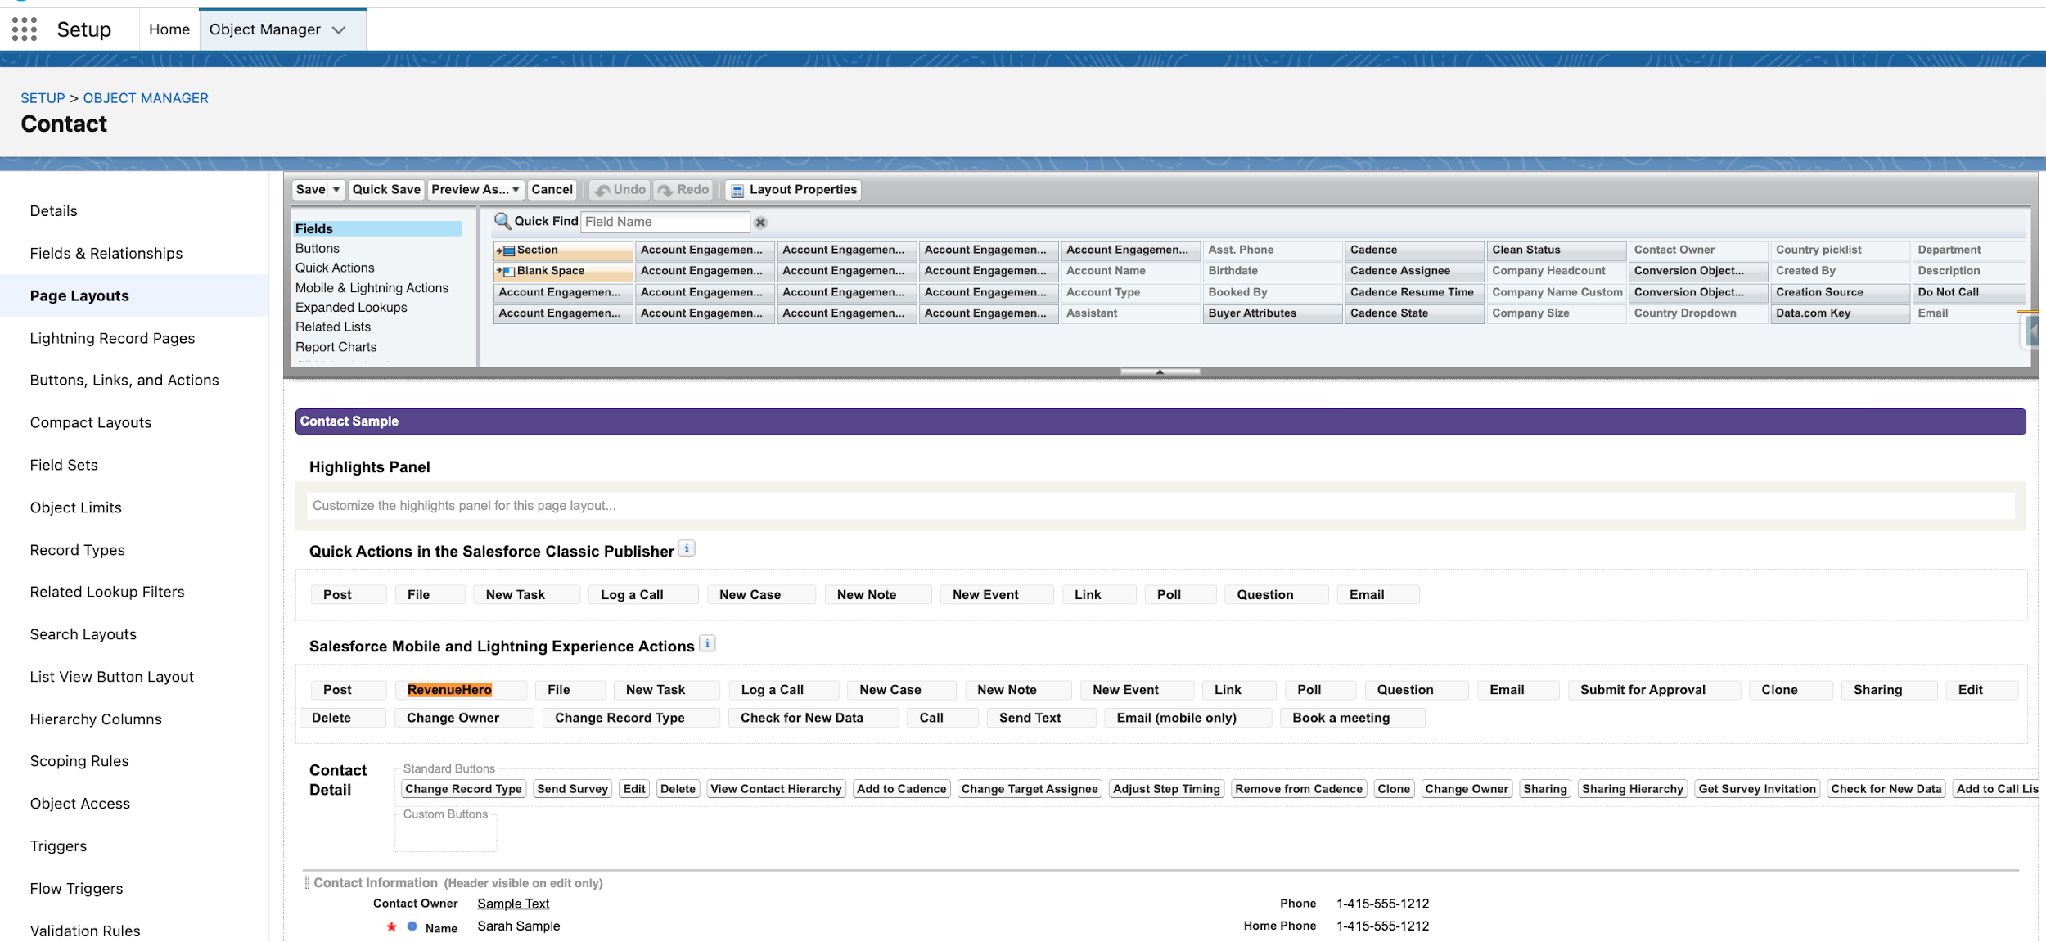
1. Go to **Setup → Object Manager → Contact → Page Layouts**.
2. Open your active layout.
3. Scroll to the **Contact Detail** section.
4. Drag the **RevenueHero** button into **Salesforce Mobile and Lightning Experience Actions**.
5. Click **Save**.
### Step 2: Add the button to the page layout
A button that exists but isn't on the layout never shows up on the record. Place it where reps will see it.
1. Go to **Setup → Object Manager → Contact → Page Layouts**.
2. Open your active layout.
3. Scroll to the **Contact Detail** section.
4. Drag the **RevenueHero** button into **Salesforce Mobile and Lightning Experience Actions**.
5. Click **Save**.
 ### Step 3: Point the Lightning record page at the page layout
Lightning record pages can override the layout's action area. If they do, your new button won't appear. This step makes the Lightning page use the layout you just edited.
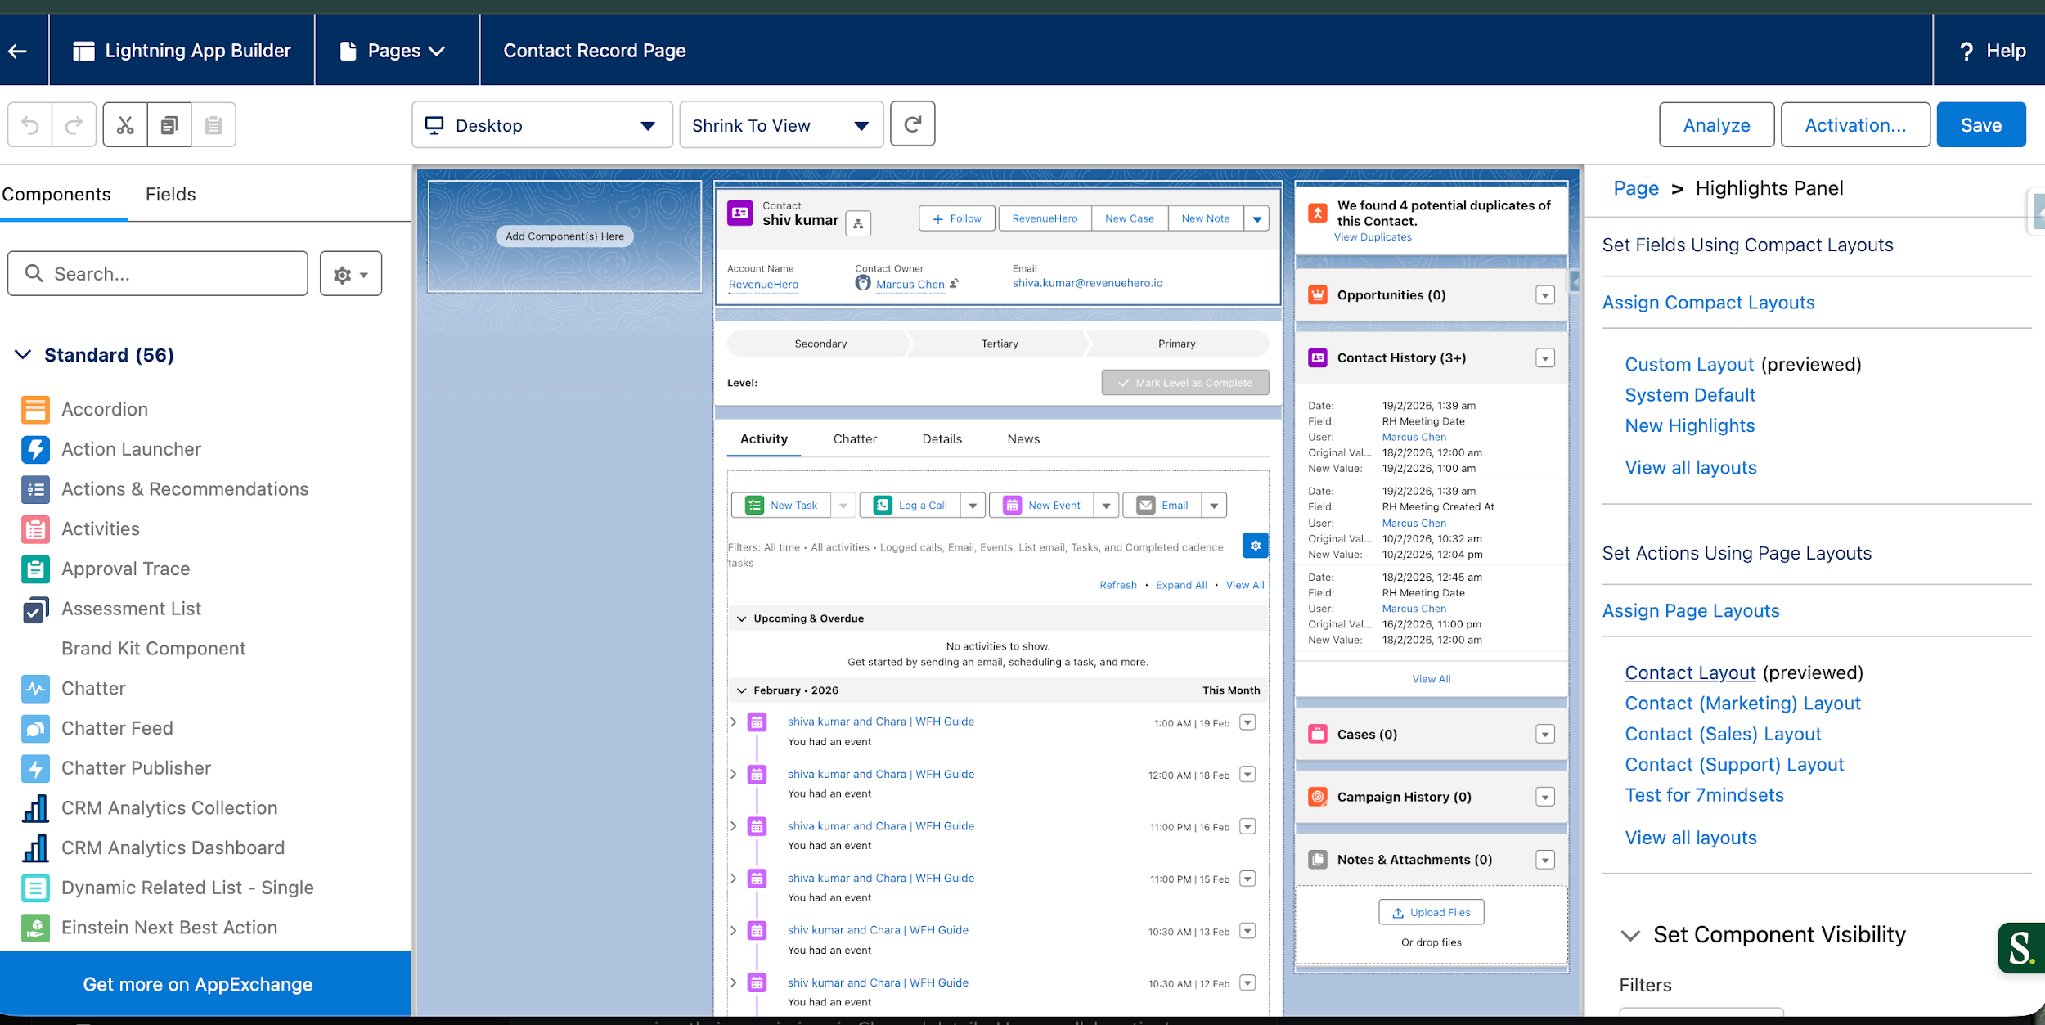
1. Go to **Setup → Lightning App Builder → Contact Record Page**.
2. Click the **Highlights Panel**.
3. Set it to **Use Page Layout**.
4. Click **Save & Activate**.
The button now appears in the action area at the top of the Contact record.
### Step 3: Point the Lightning record page at the page layout
Lightning record pages can override the layout's action area. If they do, your new button won't appear. This step makes the Lightning page use the layout you just edited.
1. Go to **Setup → Lightning App Builder → Contact Record Page**.
2. Click the **Highlights Panel**.
3. Set it to **Use Page Layout**.
4. Click **Save & Activate**.
The button now appears in the action area at the top of the Contact record.
 ## Part 2: Each rep installs the Chrome Extension
The button opens the booking popup, but the [RevenueHero Chrome Extension](/integrations/chrome-extension) is what authenticates the rep and runs the Relay experience inside Salesforce. Every rep who will book from Salesforce does this once.
1. Install the **RevenueHero Chrome Extension** from the Chrome Web Store.
2. Log in to RevenueHero. The extension uses your RevenueHero login to authenticate you.
3. Refresh Salesforce so the extension picks up your session.
If a rep's RevenueHero session expires, the popup may stop initializing. Logging back in to RevenueHero and refreshing Salesforce restores it.
When the popup doesn't open for one specific rep while everyone else is fine, the cause is almost always on that rep's side, not the button. On support calls the usual culprits are: the extension isn't installed, the rep isn't logged in to RevenueHero, or their Salesforce user is missing the layout. Have them confirm those three before escalating.
## Validation checklist
Before you tell the team it's live, confirm:
* Button created with the correct URL
* `{!Contact.Email}` merge field present in the URL
* Button visible on the Contact record
* Lightning record page set to **Use Page Layout**
* Extension installed and the rep logged in to RevenueHero
* Booking popup launches from a Contact record
* The contact's email auto-populates in the booking flow
* Relay routing assigns the meeting as expected
***
Your Salesforce booking button is live. Reps can now hand off and book straight from a Contact record. 🎉🎉🎉
What the extension does across Gmail, Salesforce, and HubSpot.
How reps book and hand off meetings inside the CRM.
Set up the routing rules the booking button uses.
Connect Salesforce so bookings sync back correctly.
## Part 2: Each rep installs the Chrome Extension
The button opens the booking popup, but the [RevenueHero Chrome Extension](/integrations/chrome-extension) is what authenticates the rep and runs the Relay experience inside Salesforce. Every rep who will book from Salesforce does this once.
1. Install the **RevenueHero Chrome Extension** from the Chrome Web Store.
2. Log in to RevenueHero. The extension uses your RevenueHero login to authenticate you.
3. Refresh Salesforce so the extension picks up your session.
If a rep's RevenueHero session expires, the popup may stop initializing. Logging back in to RevenueHero and refreshing Salesforce restores it.
When the popup doesn't open for one specific rep while everyone else is fine, the cause is almost always on that rep's side, not the button. On support calls the usual culprits are: the extension isn't installed, the rep isn't logged in to RevenueHero, or their Salesforce user is missing the layout. Have them confirm those three before escalating.
## Validation checklist
Before you tell the team it's live, confirm:
* Button created with the correct URL
* `{!Contact.Email}` merge field present in the URL
* Button visible on the Contact record
* Lightning record page set to **Use Page Layout**
* Extension installed and the rep logged in to RevenueHero
* Booking popup launches from a Contact record
* The contact's email auto-populates in the booking flow
* Relay routing assigns the meeting as expected
***
Your Salesforce booking button is live. Reps can now hand off and book straight from a Contact record. 🎉🎉🎉
What the extension does across Gmail, Salesforce, and HubSpot.
How reps book and hand off meetings inside the CRM.
Set up the routing rules the booking button uses.
Connect Salesforce so bookings sync back correctly.