> ## Documentation Index
> Fetch the complete documentation index at: https://help.revenuehero.io/llms.txt
> Use this file to discover all available pages before exploring further.
# How to create a post-booking form?
> Collect the context your reps need after a prospect books, without adding fields that hurt your conversion rate.
Every field you add to a form before booking is another chance for a prospect to drop off. So you keep the marketing form short, but then your SDRs spend the days before the demo chasing the same details over email: current tools, what they actually want to see, how they found you.
A post-booking form moves those questions to after the slot is locked. The prospect has already committed to the meeting, so you can ask for richer context without putting the booking at risk, and your reps walk in prepared.
**BEFORE YOU BEGIN**
Post-booking forms attach to an inbound router and fire once a meeting is booked, so you need [an inbound router](/routers/inbound/create-inbound-router) that routes and books your prospects in place first.
## How post-booking forms work
A post-booking form is built with the same form builder as any other RevenueHero form. What makes it a post-booking form is the type you pick when you create it, and that type decides when the form runs. A marketing form runs before the meeting is booked, so its fields qualify and route the prospect. A post-booking form runs after the prospect picks a slot, on the confirmation screen, once the meeting is already on the calendar.
That timing changes what each type is good for.
| | Marketing form | Post-booking form |
| ---------------------- | -------------------------------------------------- | ----------------------------------------------------------------------------------------- |
| When it shows | Before booking, to qualify and route | After booking, on the confirmation screen |
| Effect of extra fields | Each field adds drop-off risk | No risk to the booking, it is already made |
| Best for | Email, company, the one or two fields you route on | Prep context: use case, pain points, current stack;
Marketing attribution questions |
| Powers routing? | Yes | No, the meeting is already assigned |
The rule of thumb your peers land on: keep the marketing form to the few fields you actually route on, and push everything else your rep wants to know into the post-booking form.
## Create a post-booking form
### Step 1: Open Forms
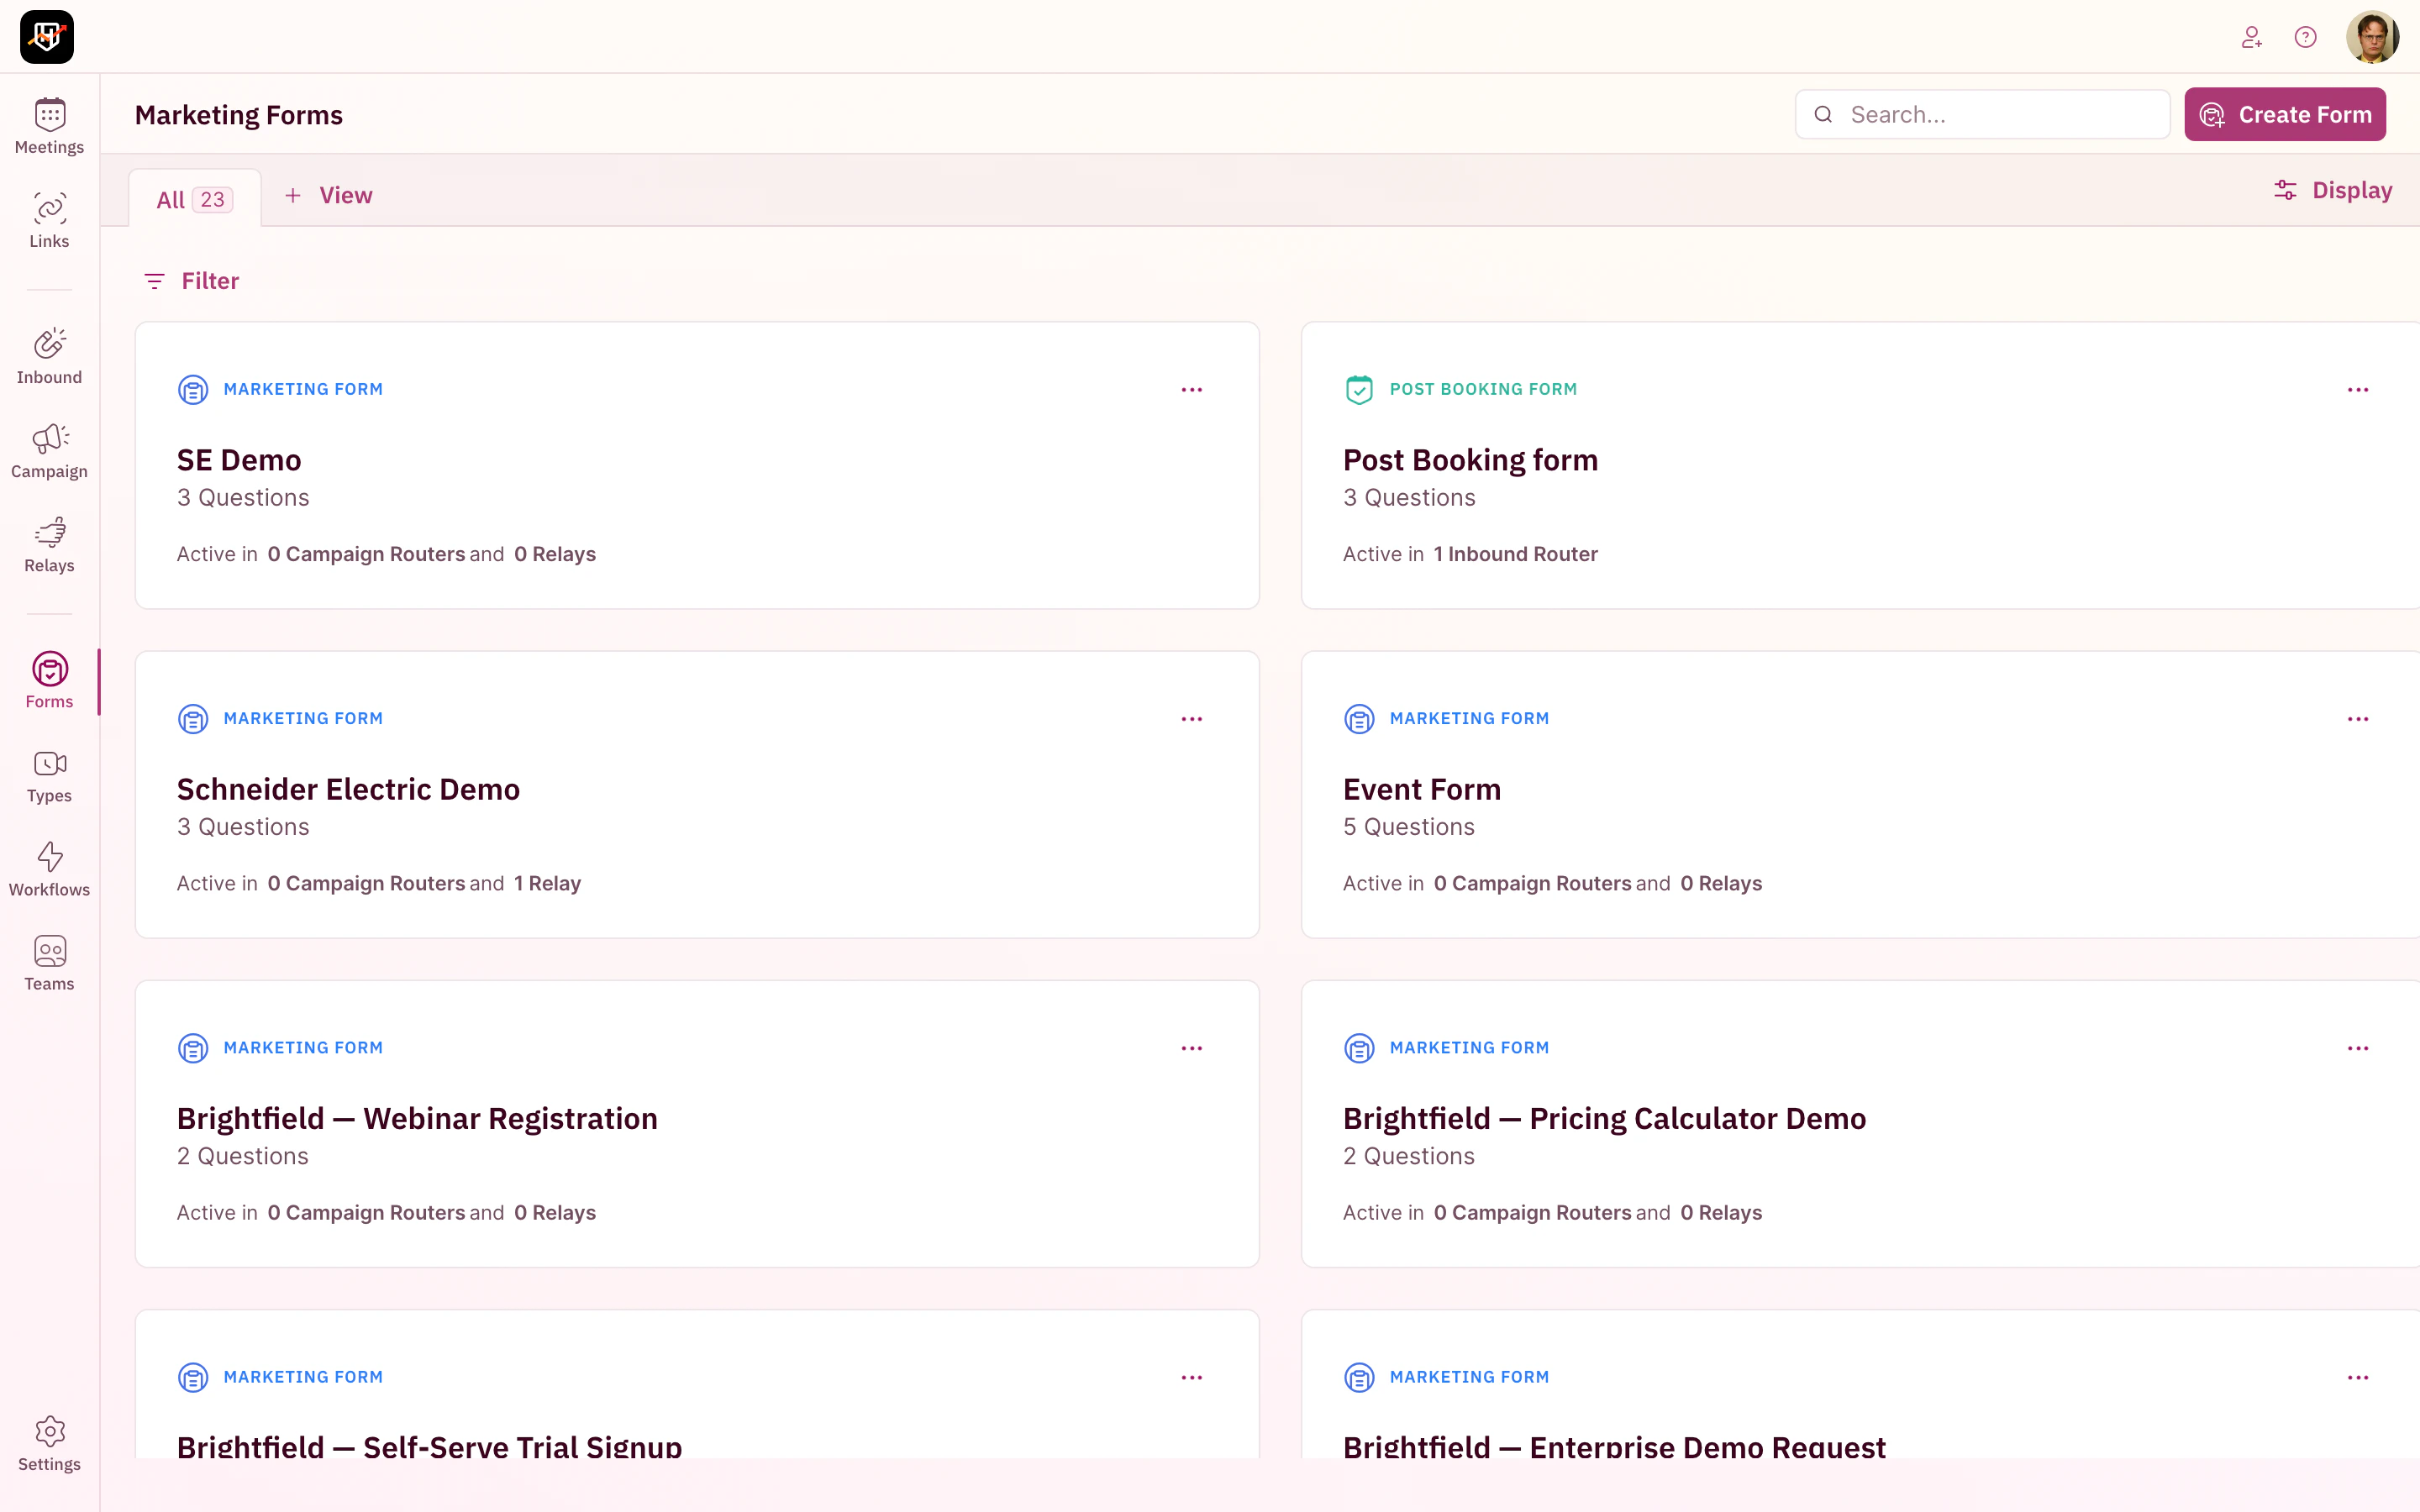
1. In the left sidebar, click **Forms**.
You land on **Marketing Forms**, the org-wide library of every form RevenueHero hosts. Both your marketing forms and your post-booking forms live here.
 ### Step 2: Create the form and choose the post-booking type
1. Click **Create Form** in the top right.
2. In the modal, choose **Post Booking Form**.
The two types map to the two jobs above. **Marketing Form** captures and qualifies leads before a meeting is booked. **Post Booking Form** gathers additional details after a meeting is scheduled. Picking the right type here is what tells RevenueHero to show this form on the confirmation step rather than as a routing gate.
### Step 2: Create the form and choose the post-booking type
1. Click **Create Form** in the top right.
2. In the modal, choose **Post Booking Form**.
The two types map to the two jobs above. **Marketing Form** captures and qualifies leads before a meeting is booked. **Post Booking Form** gathers additional details after a meeting is scheduled. Picking the right type here is what tells RevenueHero to show this form on the confirmation step rather than as a routing gate.
 ### Step 3: Name the form
Give it a name your team will recognize in the library and on the router, for example `Demo prep questions`. Names matter once you have several forms, because you select the form by name when you attach it to a router.
### Step 4: Add your questions
Add a question for each thing your rep needs to know before the call. You build questions two ways:
* **From a CRM property.** Search your CRM fields, grouped under **Personal**, **Company & Job**, **Qualification**, and **Others**, and add one. The prospect's answer writes straight back to that field on their record.
* **As a custom input.** Add a **Text Input**, **Single Choice**, or **Multiple Choice** question that is not tied to a CRM field, for anything your CRM has no field for.
Mark the questions you need answered as required. You can also set conditions on a question so it only shows based on an earlier answer.
### Step 3: Name the form
Give it a name your team will recognize in the library and on the router, for example `Demo prep questions`. Names matter once you have several forms, because you select the form by name when you attach it to a router.
### Step 4: Add your questions
Add a question for each thing your rep needs to know before the call. You build questions two ways:
* **From a CRM property.** Search your CRM fields, grouped under **Personal**, **Company & Job**, **Qualification**, and **Others**, and add one. The prospect's answer writes straight back to that field on their record.
* **As a custom input.** Add a **Text Input**, **Single Choice**, or **Multiple Choice** question that is not tied to a CRM field, for anything your CRM has no field for.
Mark the questions you need answered as required. You can also set conditions on a question so it only shows based on an earlier answer.
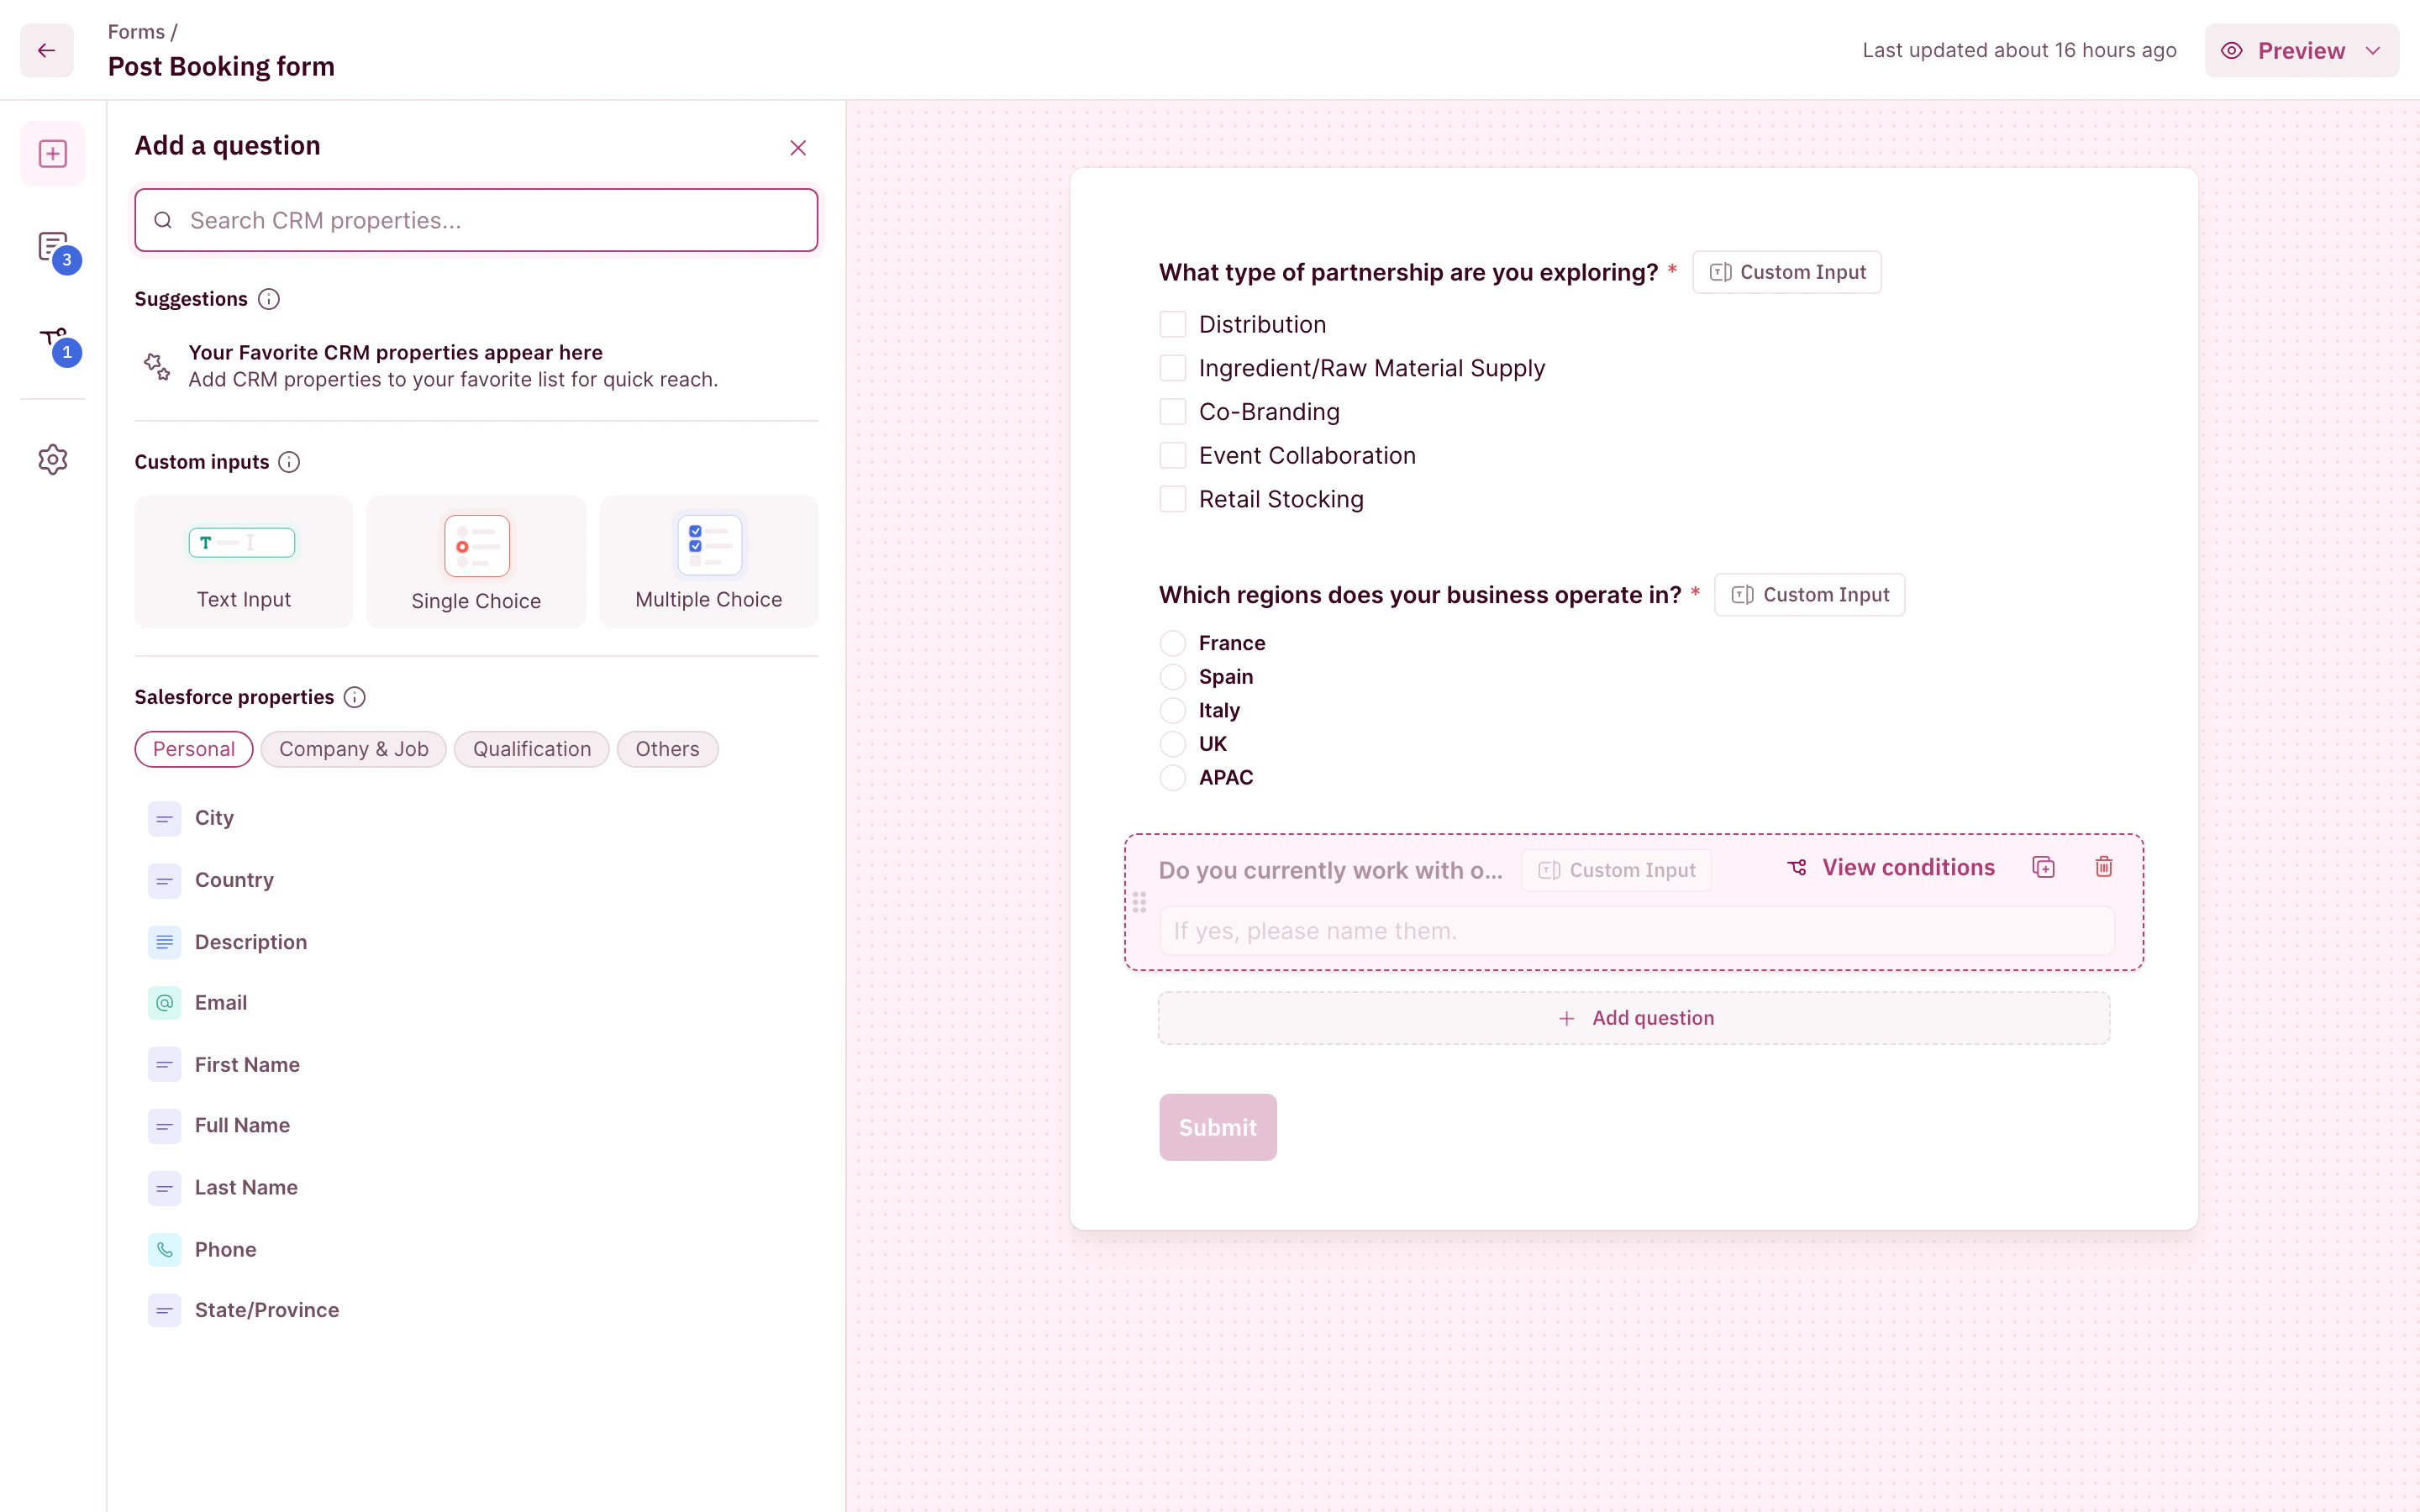 This is the place for the questions that used to eat your SDRs' time before every demo. Team size, current tools, and the specific use case give the rep enough to tailor the call. One team set the phone number field here as required so they always had a fallback channel, without adding that field to the marketing form where it would have cost them bookings.
### Step 5: Save
Save the form. It now appears in the library with a **Post Booking Form** label, ready to attach to a router.
## Attach the form to your inbound router
A post-booking form does nothing on its own. It only fires when it is attached to the router that books the meeting.
1. In the left sidebar, click **Inbound**, then open the router you want.
2. In the **Meeting Settings** panel on the right, find **Post Booking Form** and toggle it on.
3. Pick your post-booking form from the list below the toggle, then **Save**.
This is the place for the questions that used to eat your SDRs' time before every demo. Team size, current tools, and the specific use case give the rep enough to tailor the call. One team set the phone number field here as required so they always had a fallback channel, without adding that field to the marketing form where it would have cost them bookings.
### Step 5: Save
Save the form. It now appears in the library with a **Post Booking Form** label, ready to attach to a router.
## Attach the form to your inbound router
A post-booking form does nothing on its own. It only fires when it is attached to the router that books the meeting.
1. In the left sidebar, click **Inbound**, then open the router you want.
2. In the **Meeting Settings** panel on the right, find **Post Booking Form** and toggle it on.
3. Pick your post-booking form from the list below the toggle, then **Save**.
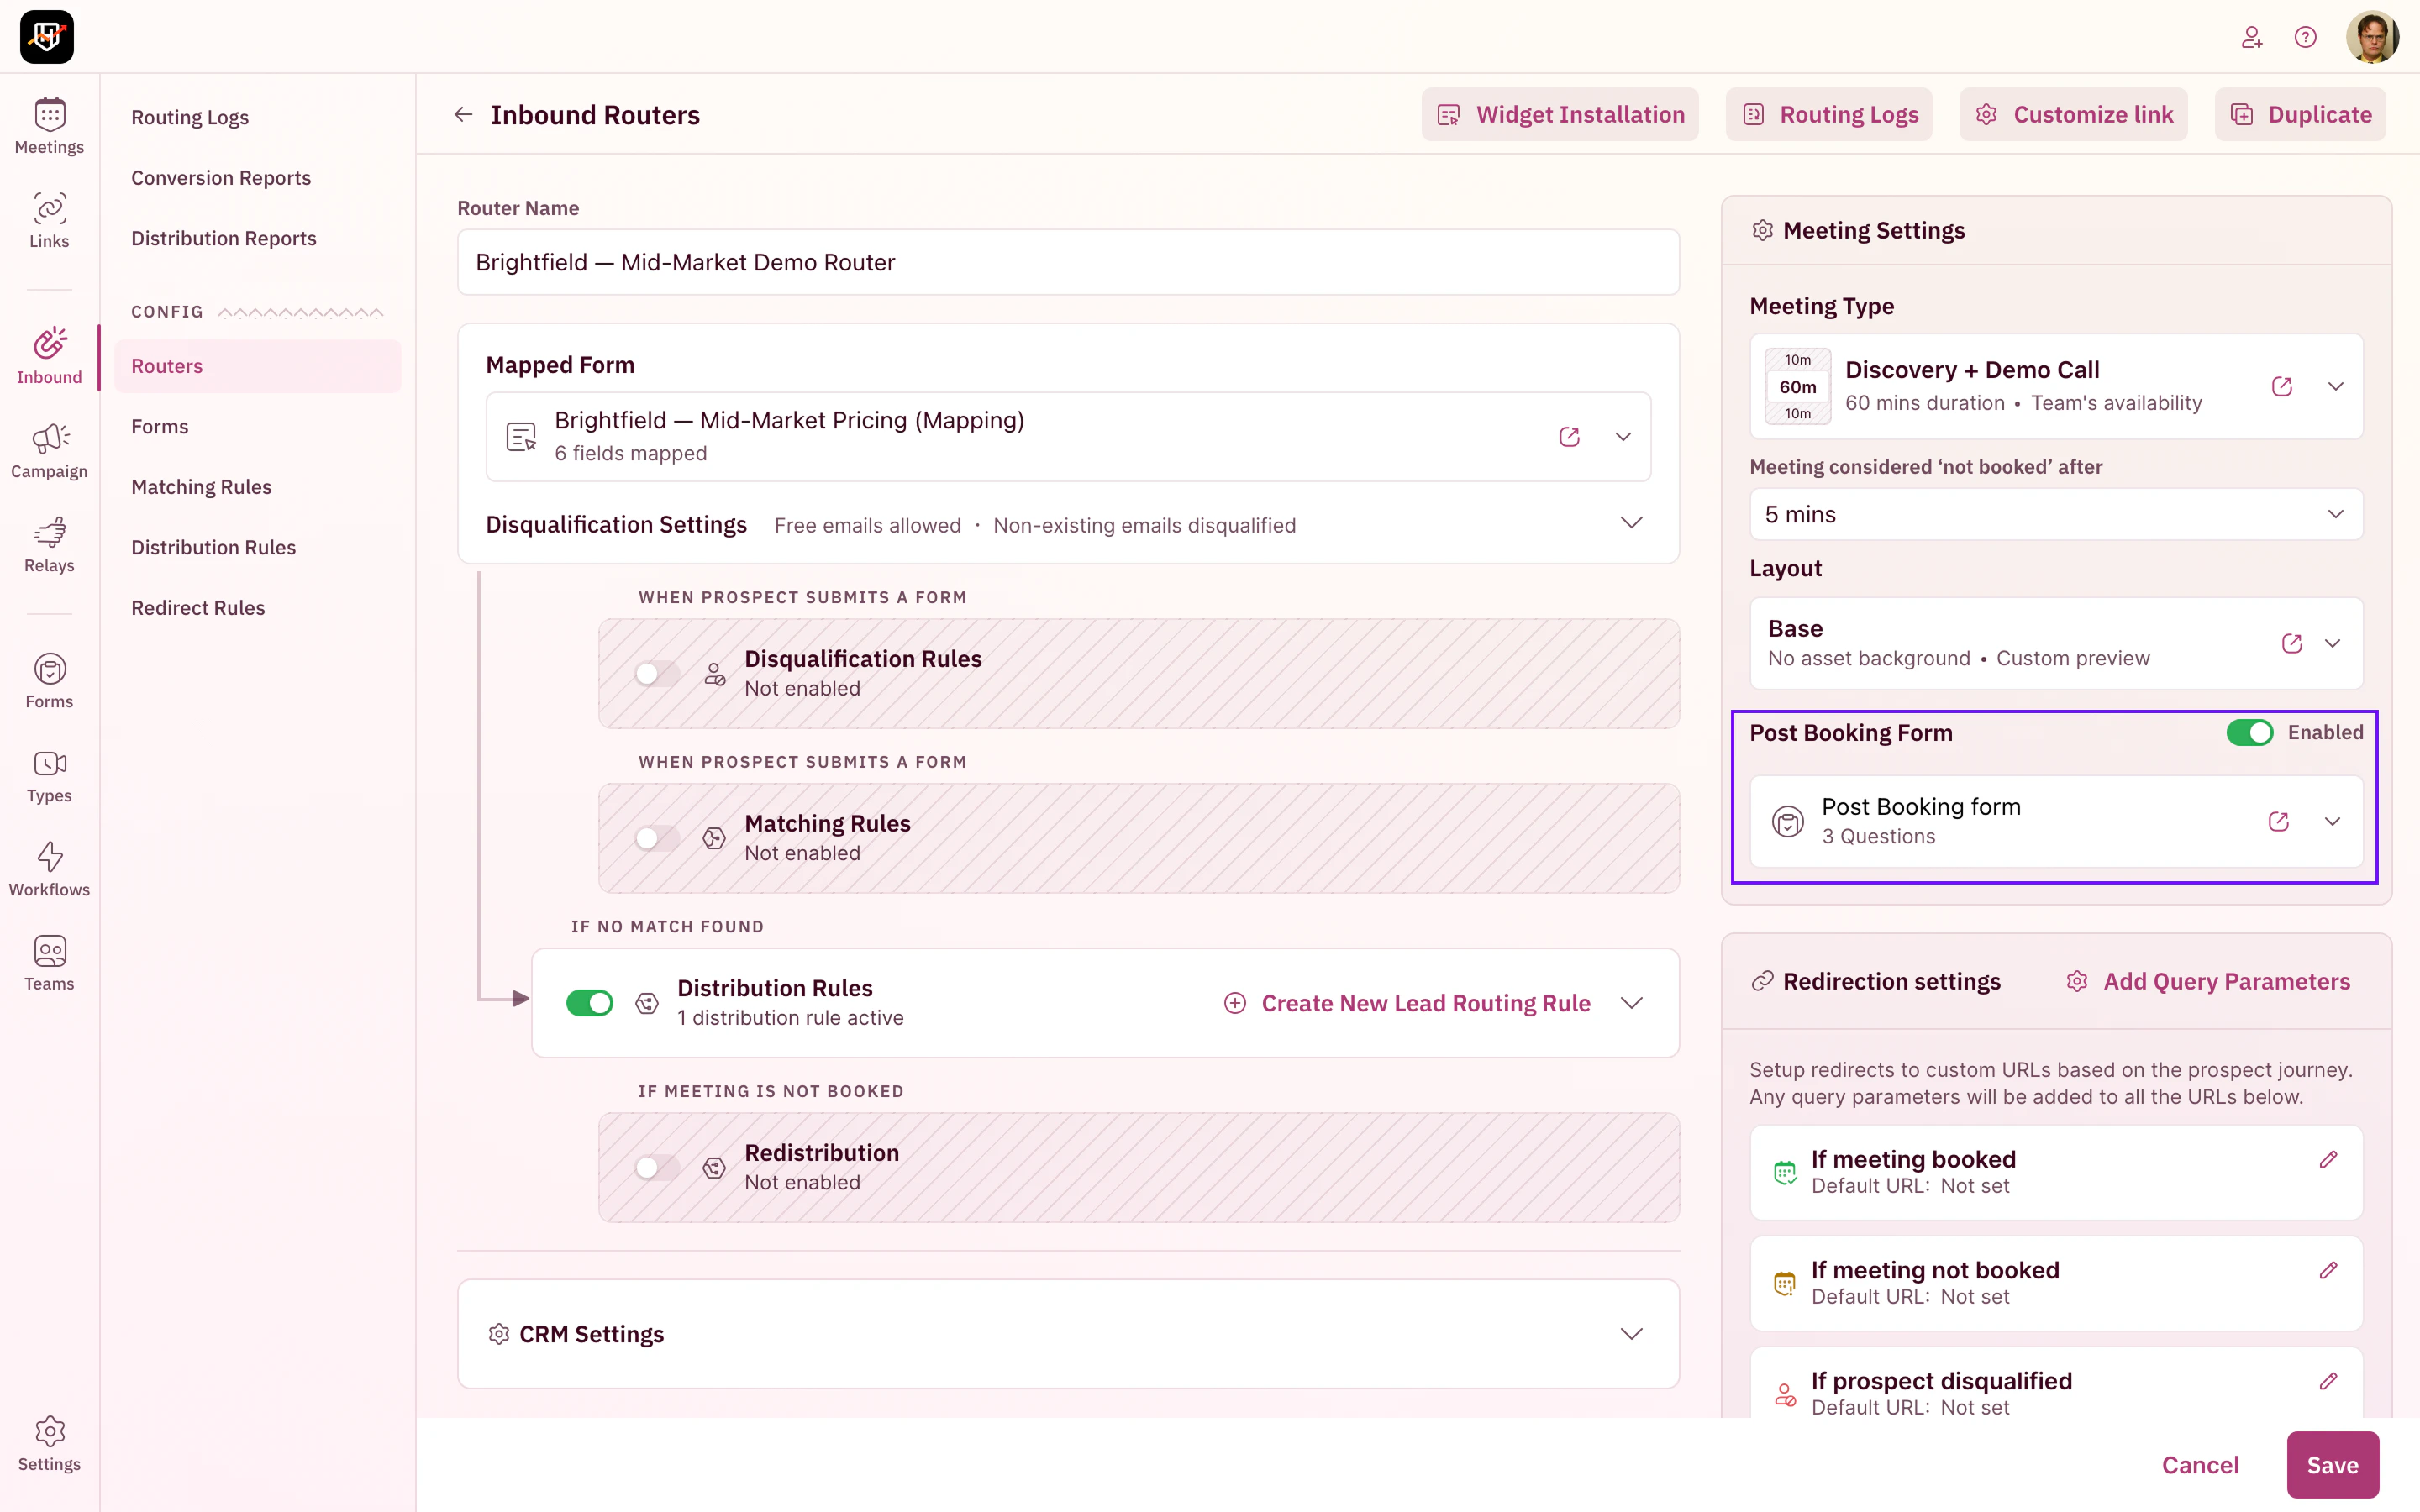 When you build a router from scratch, the same control appears in the final **Configure Router** step as **Gather more info from your qualified prospects**. From now on, any prospect who books through this router sees the form on the confirmation screen after they pick their time.
A post-booking form only shows after a meeting is booked. Prospects who never book never see it, so it cannot qualify or filter anyone. Keep every field you route or disqualify on in the marketing form. Put only prep questions in the post-booking form.
## Where the answers go
Questions you mapped to a CRM property write the prospect's answer straight to that field on their record, so your reps get the new context without anyone retyping it.
***
Your post-booking form is live. Your reps now get the prep they need automatically, and your booking rate stays where you want it. 🎉🎉🎉
The full form builder in depth: CRM properties, custom inputs, smart logic, and submit settings.
Set up the router that qualifies, routes, and books your inbound prospects.
Define the duration, availability, and invite for the meetings your prospects book.
Choose which form answers show up in the calendar invite, and leave the routing-only fields out.
When you build a router from scratch, the same control appears in the final **Configure Router** step as **Gather more info from your qualified prospects**. From now on, any prospect who books through this router sees the form on the confirmation screen after they pick their time.
A post-booking form only shows after a meeting is booked. Prospects who never book never see it, so it cannot qualify or filter anyone. Keep every field you route or disqualify on in the marketing form. Put only prep questions in the post-booking form.
## Where the answers go
Questions you mapped to a CRM property write the prospect's answer straight to that field on their record, so your reps get the new context without anyone retyping it.
***
Your post-booking form is live. Your reps now get the prep they need automatically, and your booking rate stays where you want it. 🎉🎉🎉
The full form builder in depth: CRM properties, custom inputs, smart logic, and submit settings.
Set up the router that qualifies, routes, and books your inbound prospects.
Define the duration, availability, and invite for the meetings your prospects book.
Choose which form answers show up in the calendar invite, and leave the routing-only fields out.