> ## Documentation Index
> Fetch the complete documentation index at: https://help.revenuehero.io/llms.txt
> Use this file to discover all available pages before exploring further.
# How to add members to a team?
> Add existing users or invite new reps to a team so they can start receiving meetings through round-robin distribution.
Your team is only as useful as the reps on it. When a new hire joins, a rep switches territories, or you're setting up a team for the first time, you need to add them to the right team so distribution rules can assign meetings to them. There are two ways to do this: add an existing RevenueHero user from the team detail page, or invite a brand new user and assign them to a team in one step.
**BEFORE YOU BEGIN**
1. You need **Admin** permissions in RevenueHero to add members
2. New users must be [invited to RevenueHero](/settings/organization/all-users) first, unless you use the invite flow below which handles both steps at once
3. Each rep should [connect their calendar](/settings/personal/my-integrations) after being added. Without a connected calendar, they won't receive any bookings.
## Two ways to add members
| Method | When to use |
| ------------------------------------------- | --------------------------------------------------------------------------------------------------- |
| **Invite Member** from the team detail page | The rep already has a RevenueHero account. You're adding them to this specific team. |
| **Invite icon** from the top navigation bar | The rep is brand new. You want to invite them to RevenueHero and assign them to a team in one step. |
## Add an existing user to a team
Use this when the rep already has a RevenueHero account but isn't on this team yet.
### Step 1: Open the team
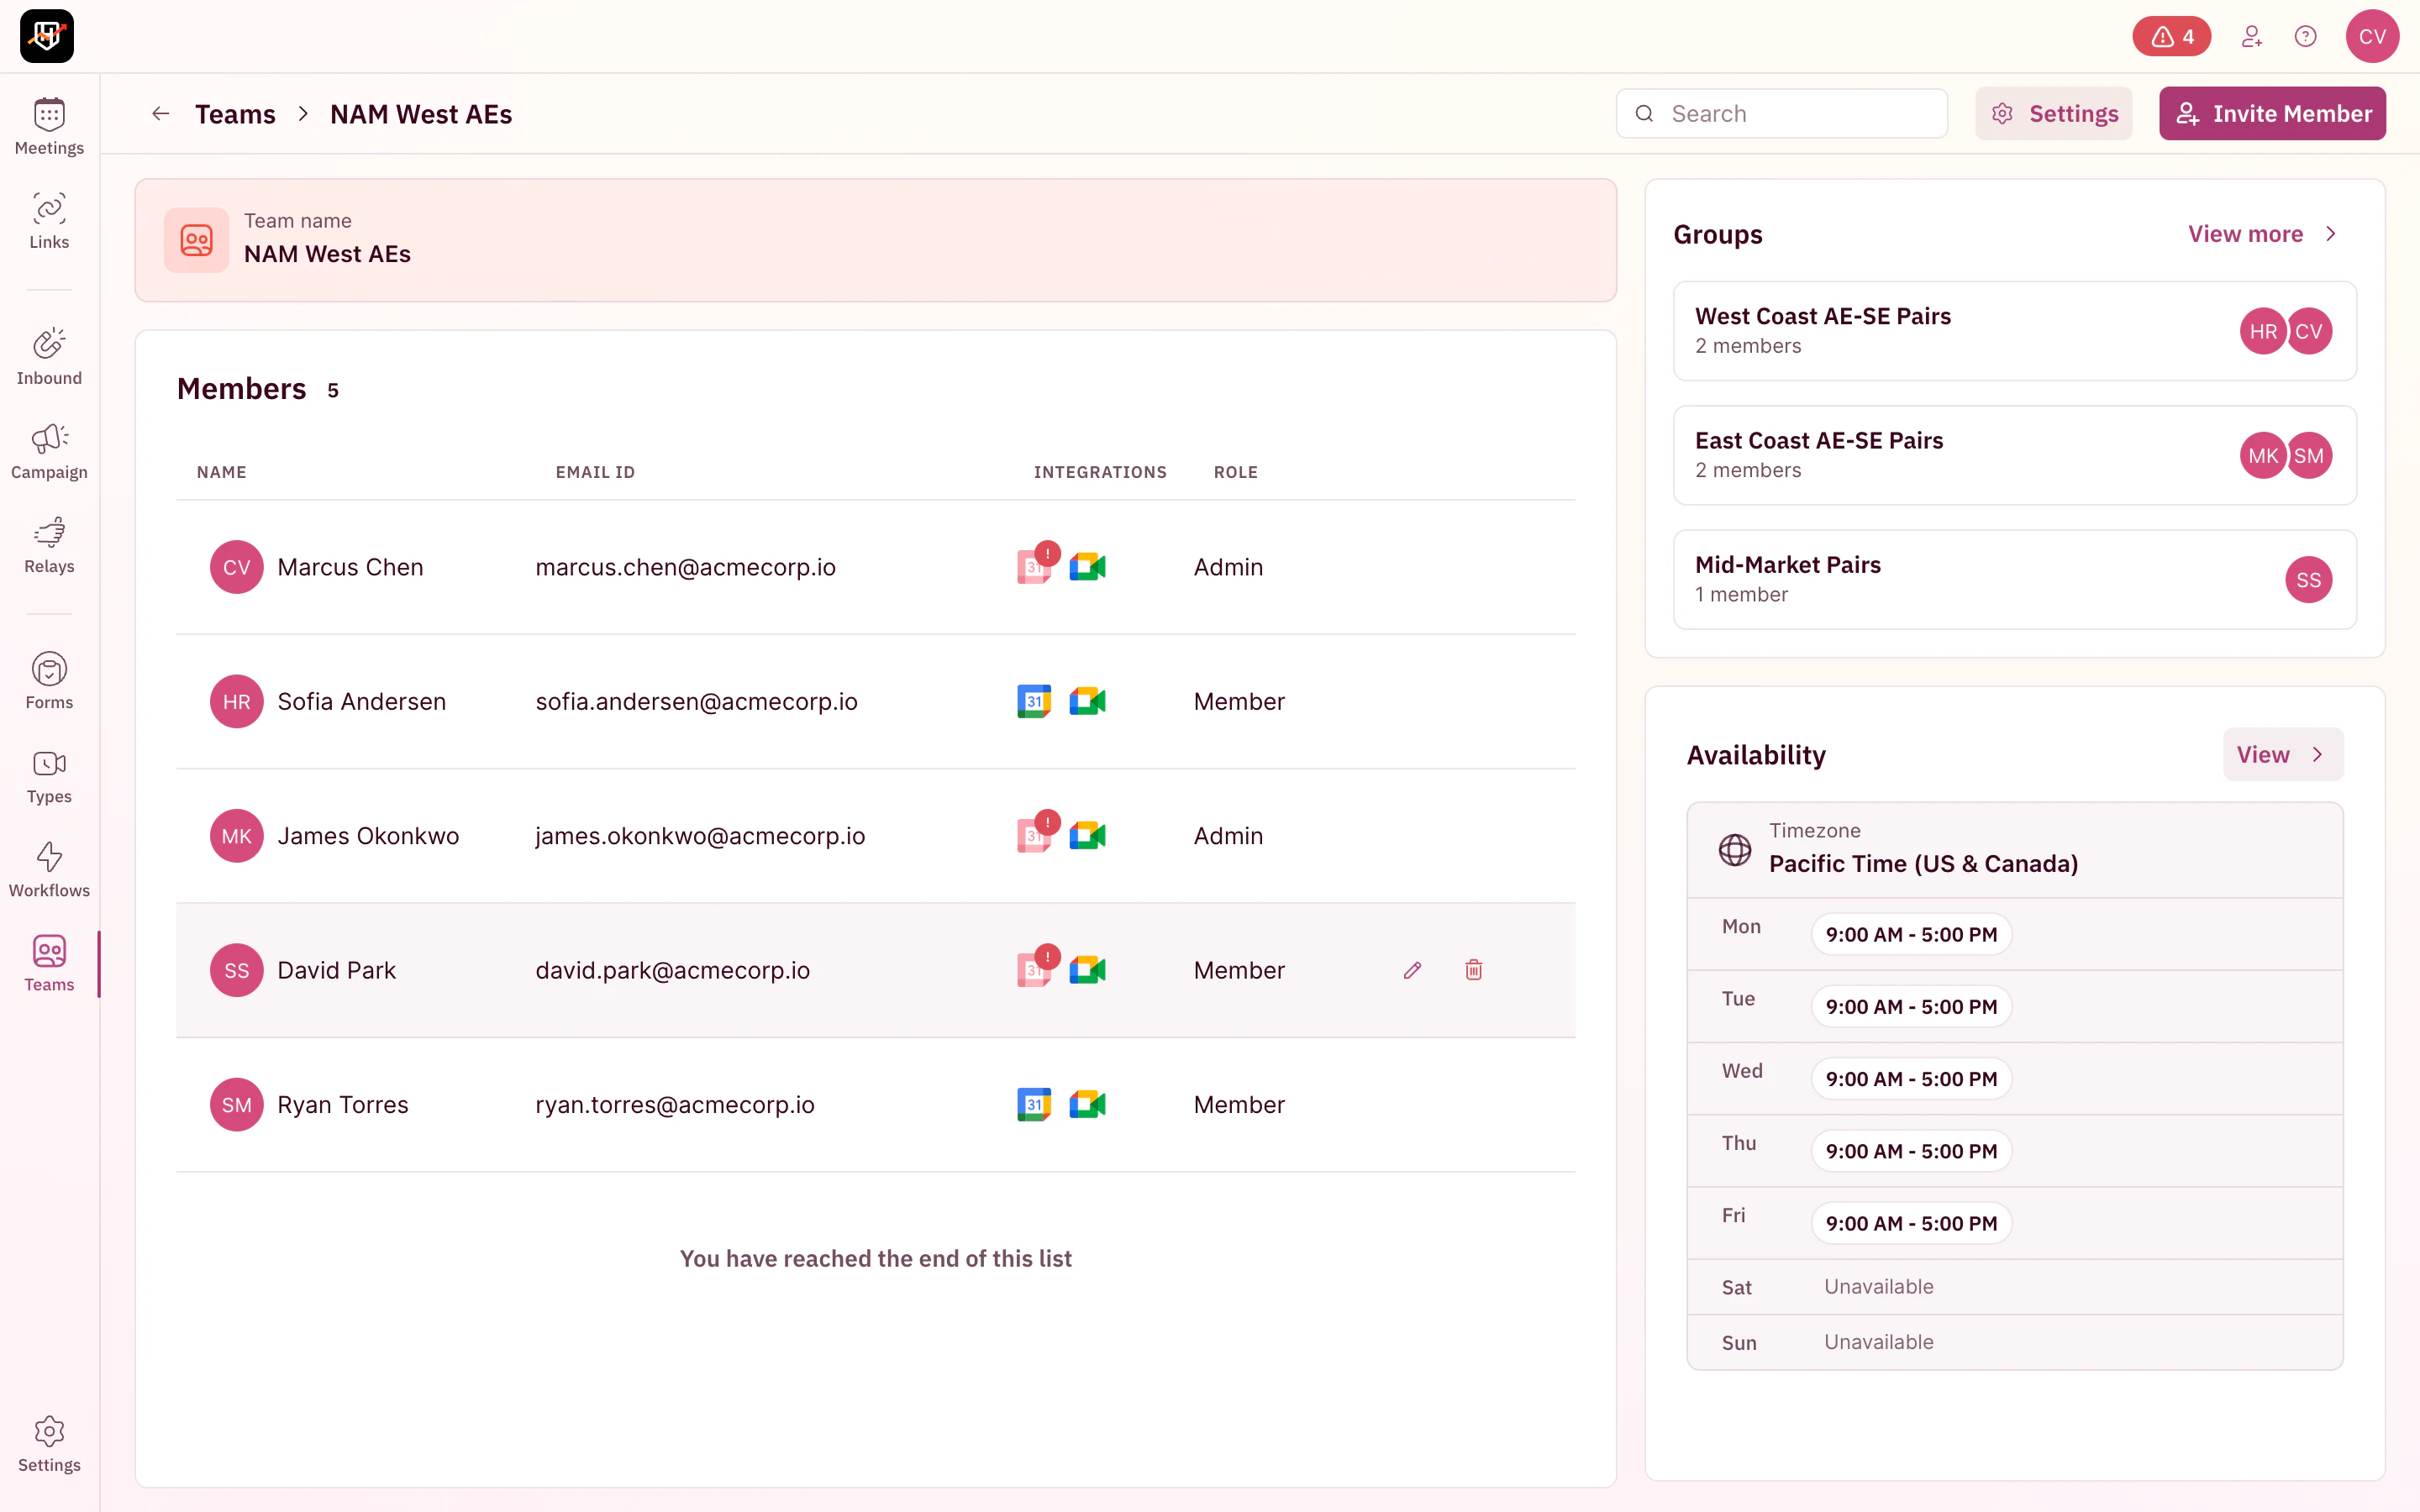
Click **Teams** in the left sidebar, then click the team you want to add members to.
 ### Step 2: Click Invite Member
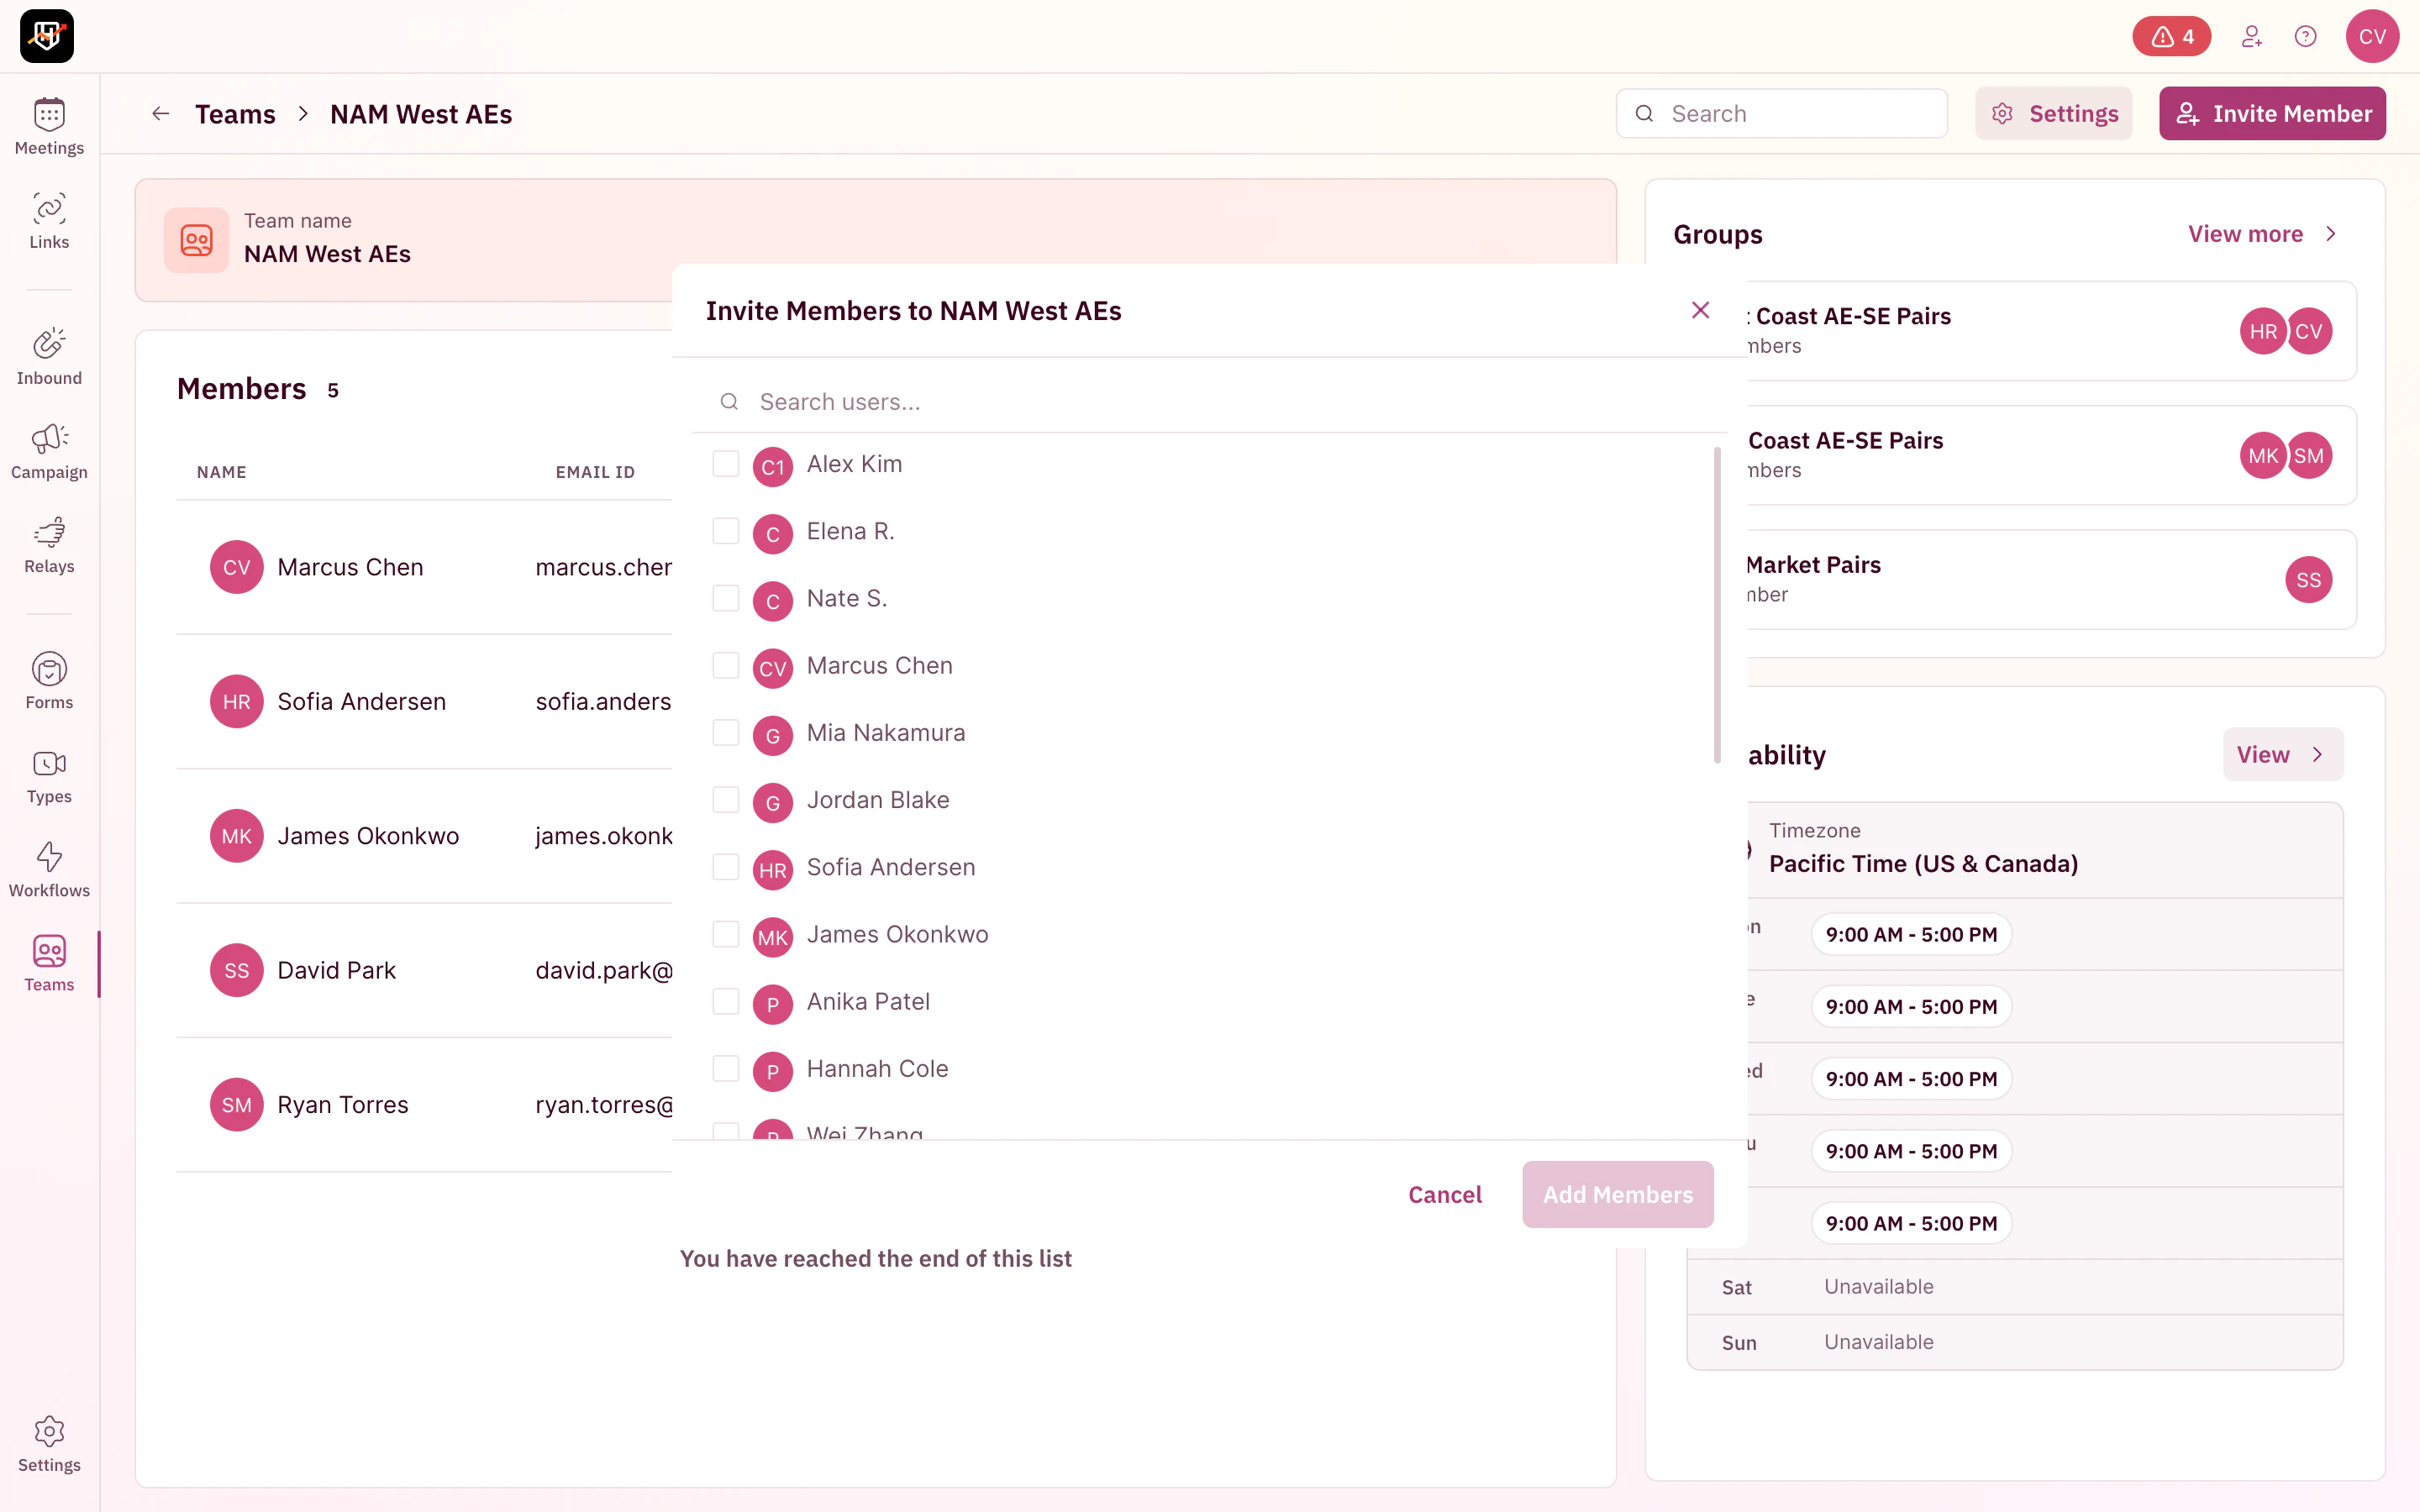
Click **Invite Member** in the top-right corner. A modal opens with a dropdown listing all RevenueHero users who aren't already on this team.
### Step 2: Click Invite Member
Click **Invite Member** in the top-right corner. A modal opens with a dropdown listing all RevenueHero users who aren't already on this team.
 ### Step 3: Select members and add
Search or scroll to find the rep, then select them from the dropdown. You can add multiple members at once. Each selected member appears below the dropdown with a **Remove** link if you change your mind.
Click **Add Members** to confirm.
Check the **Integrations** column after adding. If a rep's row shows no calendar icons, they haven't connected their calendar yet. Reach out and have them go to **Settings > My Integrations** to connect. Until they do, they won't appear as available in the scheduler and won't receive any round-robin bookings. If your team uses Microsoft 365, the rep may need their IT admin to approve the calendar integration before they can connect.
## Invite a new user and add them to a team
Use this when the rep doesn't have a RevenueHero account yet. This sends them an invite email and assigns them to a team in one step.
### Step 1: Click the invite icon
Click the **person-plus icon** in the top-right corner of any RevenueHero page (next to the help and profile icons).
### Step 2: Fill in the invite details
In the **Invite Users** modal:
* **Email**: Enter the rep's work email address. You can add multiple emails to invite several reps at once.
* **Role**: Choose the account-level role (User or Admin).
* **Add to team (Optional)**: Select one or more teams to assign the rep to immediately.
### Step 3: Select members and add
Search or scroll to find the rep, then select them from the dropdown. You can add multiple members at once. Each selected member appears below the dropdown with a **Remove** link if you change your mind.
Click **Add Members** to confirm.
Check the **Integrations** column after adding. If a rep's row shows no calendar icons, they haven't connected their calendar yet. Reach out and have them go to **Settings > My Integrations** to connect. Until they do, they won't appear as available in the scheduler and won't receive any round-robin bookings. If your team uses Microsoft 365, the rep may need their IT admin to approve the calendar integration before they can connect.
## Invite a new user and add them to a team
Use this when the rep doesn't have a RevenueHero account yet. This sends them an invite email and assigns them to a team in one step.
### Step 1: Click the invite icon
Click the **person-plus icon** in the top-right corner of any RevenueHero page (next to the help and profile icons).
### Step 2: Fill in the invite details
In the **Invite Users** modal:
* **Email**: Enter the rep's work email address. You can add multiple emails to invite several reps at once.
* **Role**: Choose the account-level role (User or Admin).
* **Add to team (Optional)**: Select one or more teams to assign the rep to immediately.
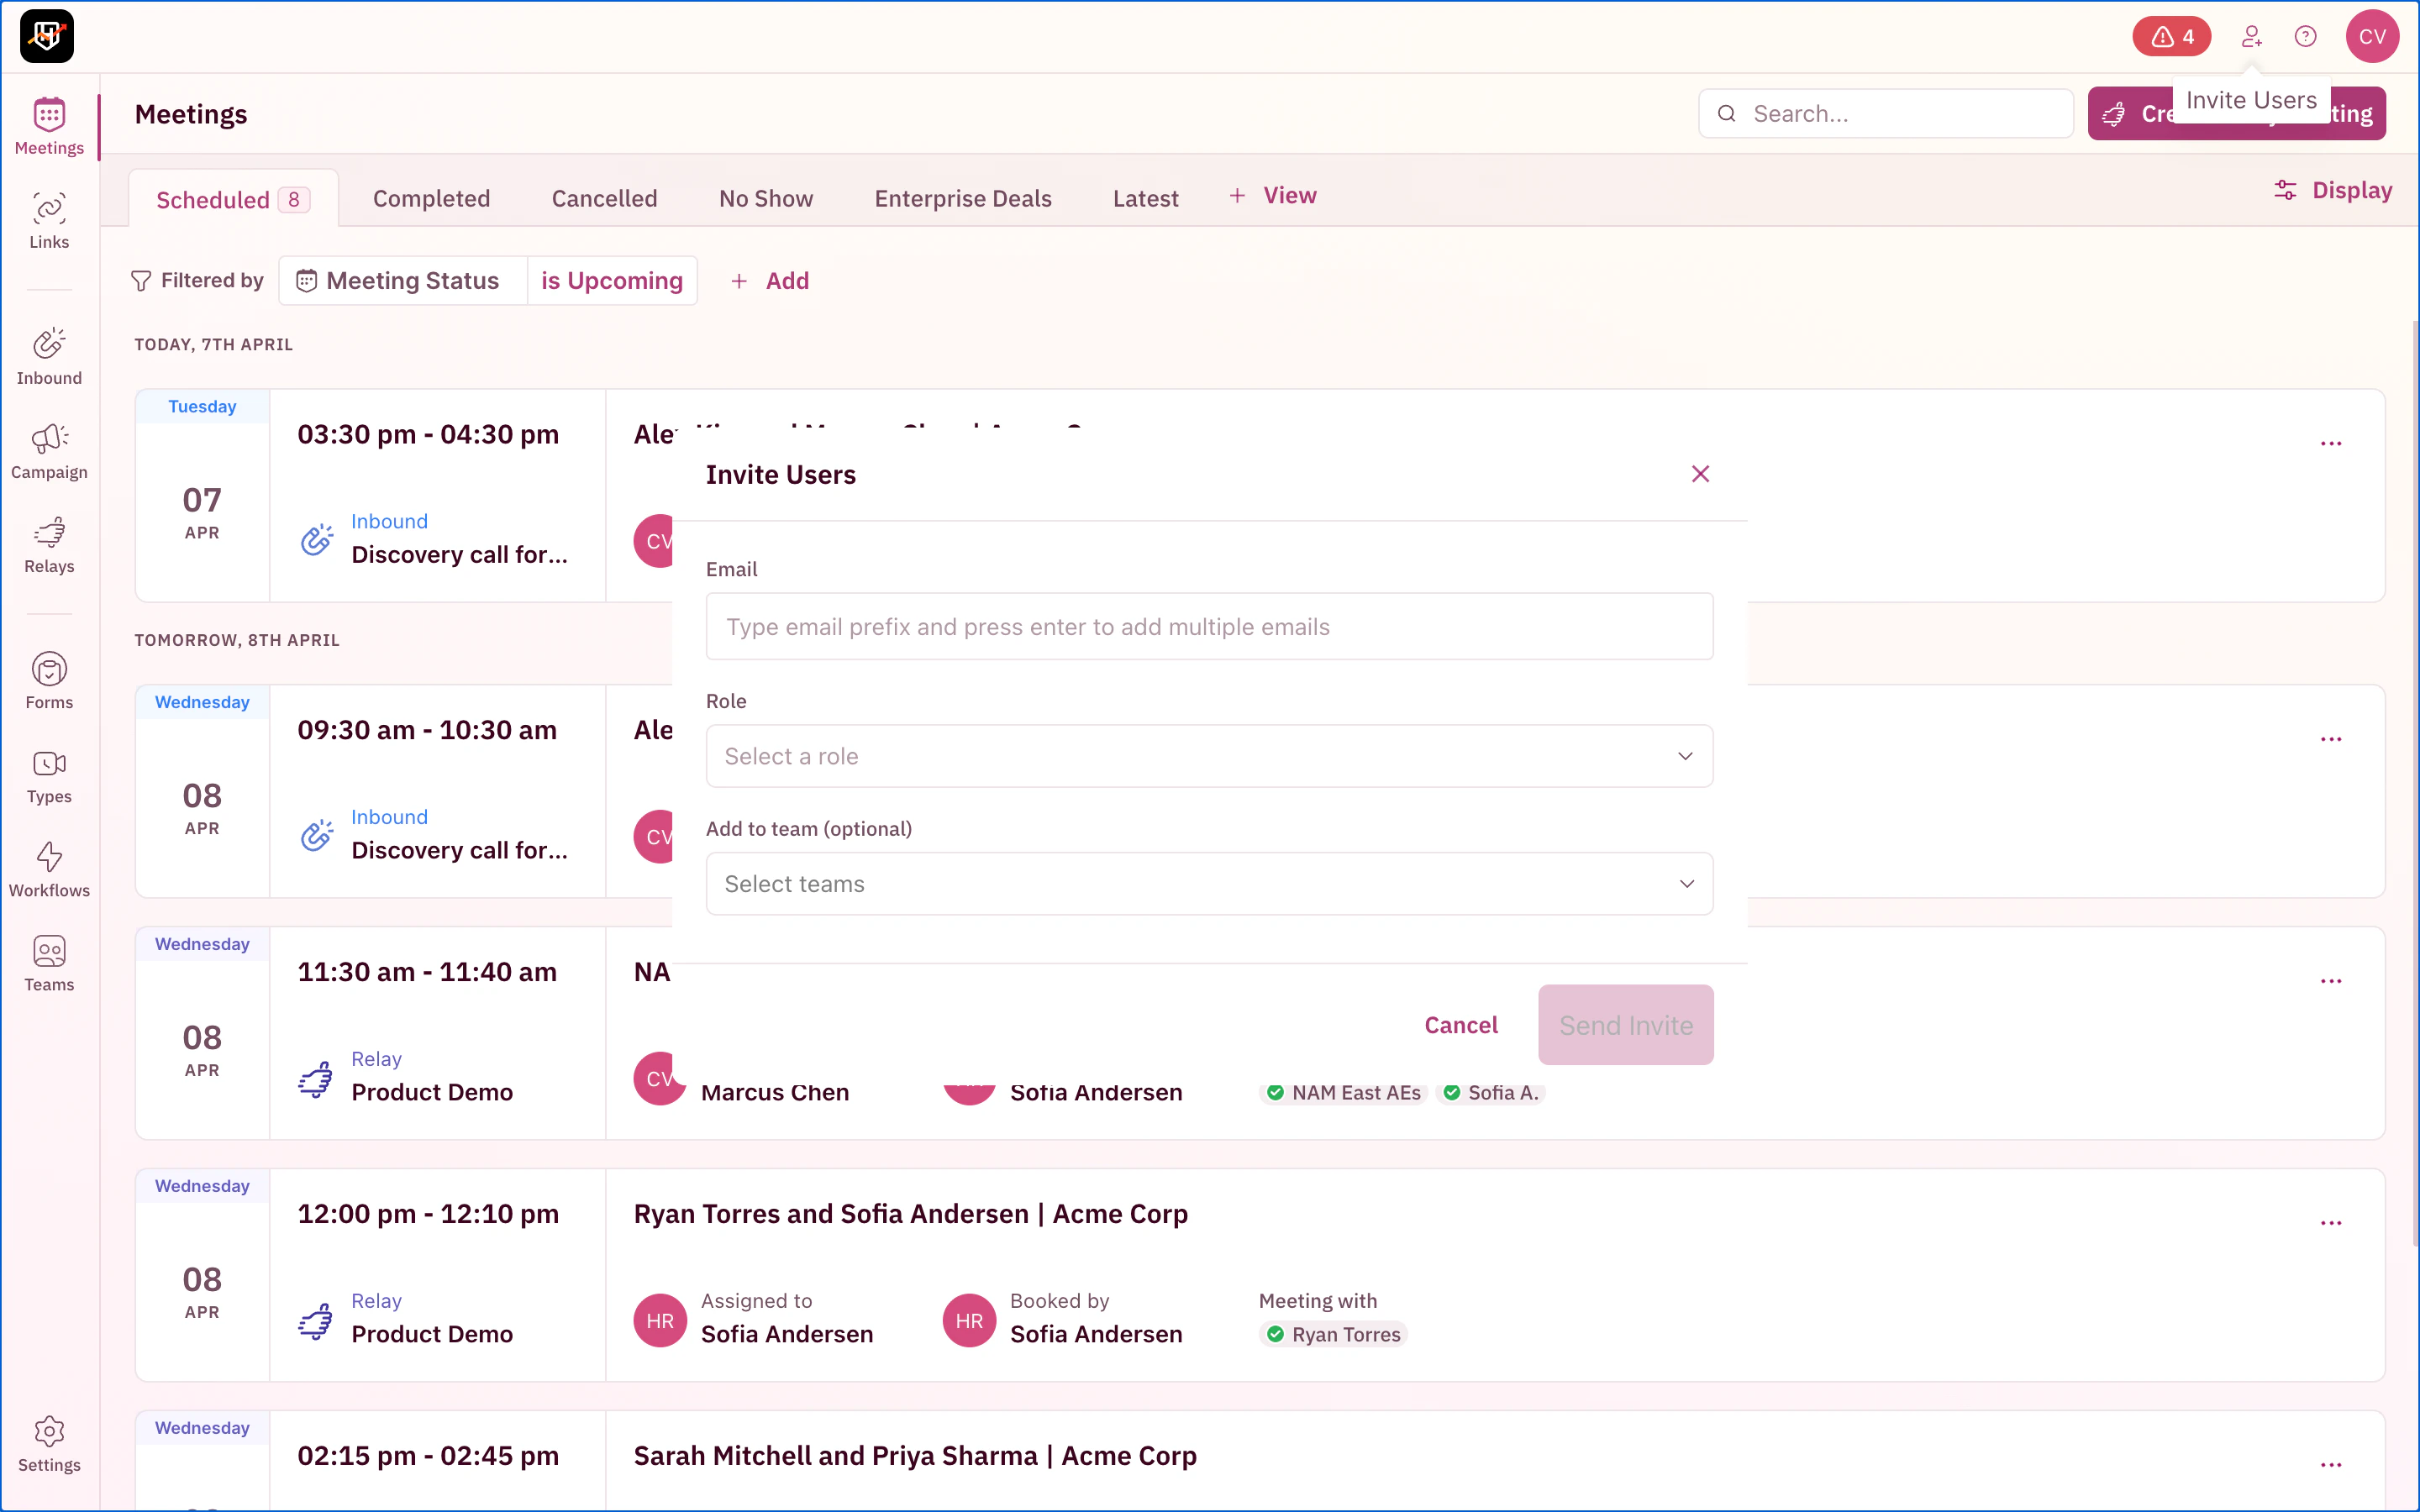 Click **Send Invite**. The rep receives an email to set up their account. Once they accept and connect their calendar, they'll start appearing as available for round-robin.
Double-check the email address before sending. The invite email must match the rep's calendar email exactly. If your company uses Okta or Microsoft SSO, verify the SSO email domain matches their inbox domain (e.g., if Okta uses `@company.com` but Outlook uses `@mail.company.com`, the rep won't be able to connect their calendar). A typo or wrong domain creates a ghost account that occupies a license but never gets activated. Delete the incorrect user from **Settings > Users** and re-invite with the correct email.
## After adding members
Adding a rep to a team doesn't automatically mean they'll receive meetings. What happens next depends on how your distribution rules are configured:
* **All members**: If the distribution rule assigns to all members of the team, the new rep is automatically included in the round-robin queue. No additional setup needed.
* **Selected members**: If the distribution rule only routes to selected members, the new rep won't get meetings until you edit the rule and select them. Go to the distribution rule, expand **Assign Meetings**, and check the new rep's name.
* **Weighted distribution**: If members have custom weights, the new rep is added with equal weight by default. Adjust their weight in the distribution rule if needed.
If you have **New Member Calibration** enabled in **Settings > Distribution**, new reps get priority in the round-robin queue to catch up with teammates who already have meetings booked. This prevents them from sitting idle while the queue cycles through everyone else.
## Member roles
Each team member has a role that controls what they can do within the team:
| Role | Can receive meetings | Can edit availability | Can manage members |
| ---------- | -------------------- | --------------------- | ----------------------- |
| **Member** | Yes | No | No |
| **Admin** | Yes | Yes | Yes (full team control) |
To change a member's role, hover over their row in the members list and click the **edit icon**.
***
Your new reps are on the team. Make sure they connect their calendar, then check your distribution rules to confirm they'll receive meetings. 🎉🎉🎉
Set up a new team from scratch with members and availability.
Safely remove reps with distribution rule reassignment.
Control how meetings get assigned to team members.
Connect your calendar and video conferencing tool.
Click **Send Invite**. The rep receives an email to set up their account. Once they accept and connect their calendar, they'll start appearing as available for round-robin.
Double-check the email address before sending. The invite email must match the rep's calendar email exactly. If your company uses Okta or Microsoft SSO, verify the SSO email domain matches their inbox domain (e.g., if Okta uses `@company.com` but Outlook uses `@mail.company.com`, the rep won't be able to connect their calendar). A typo or wrong domain creates a ghost account that occupies a license but never gets activated. Delete the incorrect user from **Settings > Users** and re-invite with the correct email.
## After adding members
Adding a rep to a team doesn't automatically mean they'll receive meetings. What happens next depends on how your distribution rules are configured:
* **All members**: If the distribution rule assigns to all members of the team, the new rep is automatically included in the round-robin queue. No additional setup needed.
* **Selected members**: If the distribution rule only routes to selected members, the new rep won't get meetings until you edit the rule and select them. Go to the distribution rule, expand **Assign Meetings**, and check the new rep's name.
* **Weighted distribution**: If members have custom weights, the new rep is added with equal weight by default. Adjust their weight in the distribution rule if needed.
If you have **New Member Calibration** enabled in **Settings > Distribution**, new reps get priority in the round-robin queue to catch up with teammates who already have meetings booked. This prevents them from sitting idle while the queue cycles through everyone else.
## Member roles
Each team member has a role that controls what they can do within the team:
| Role | Can receive meetings | Can edit availability | Can manage members |
| ---------- | -------------------- | --------------------- | ----------------------- |
| **Member** | Yes | No | No |
| **Admin** | Yes | Yes | Yes (full team control) |
To change a member's role, hover over their row in the members list and click the **edit icon**.
***
Your new reps are on the team. Make sure they connect their calendar, then check your distribution rules to confirm they'll receive meetings. 🎉🎉🎉
Set up a new team from scratch with members and availability.
Safely remove reps with distribution rule reassignment.
Control how meetings get assigned to team members.
Connect your calendar and video conferencing tool.