> ## Documentation Index
> Fetch the complete documentation index at: https://help.revenuehero.io/llms.txt
> Use this file to discover all available pages before exploring further.

# How to integrate RevenueHero with Pardot?

> Integrate RevenueHero's scheduler with your Pardot form in 10 simple steps

RevenueHero's scheduling snippet integrates natively with Pardot forms and works with both instances --

1. Where the Pardot form is used as in a Pardot landing page (**Native Pardot form installation**)
2. Where the Pardot form is embedded in any page (**Iframe Pardot form installation**)

<Note>
  **NOTE**

  When adding the RevenueHero script, make sure that that **form\_type: "pardot"** is present.

  `new RevenueHero({ routerId: '<your-routerId>', formType: 'pardot'  })`
</Note>

<Tabs>
  <Tab title="Native Pardot form installation">
    These steps help setup the RevenueHero scheduler for a Pardot form embedded in a Salesforce Landing Page.

    **In RevenueHero**:

    1. Setup your [Inbound Router](/routers/inbound/create-inbound-router).
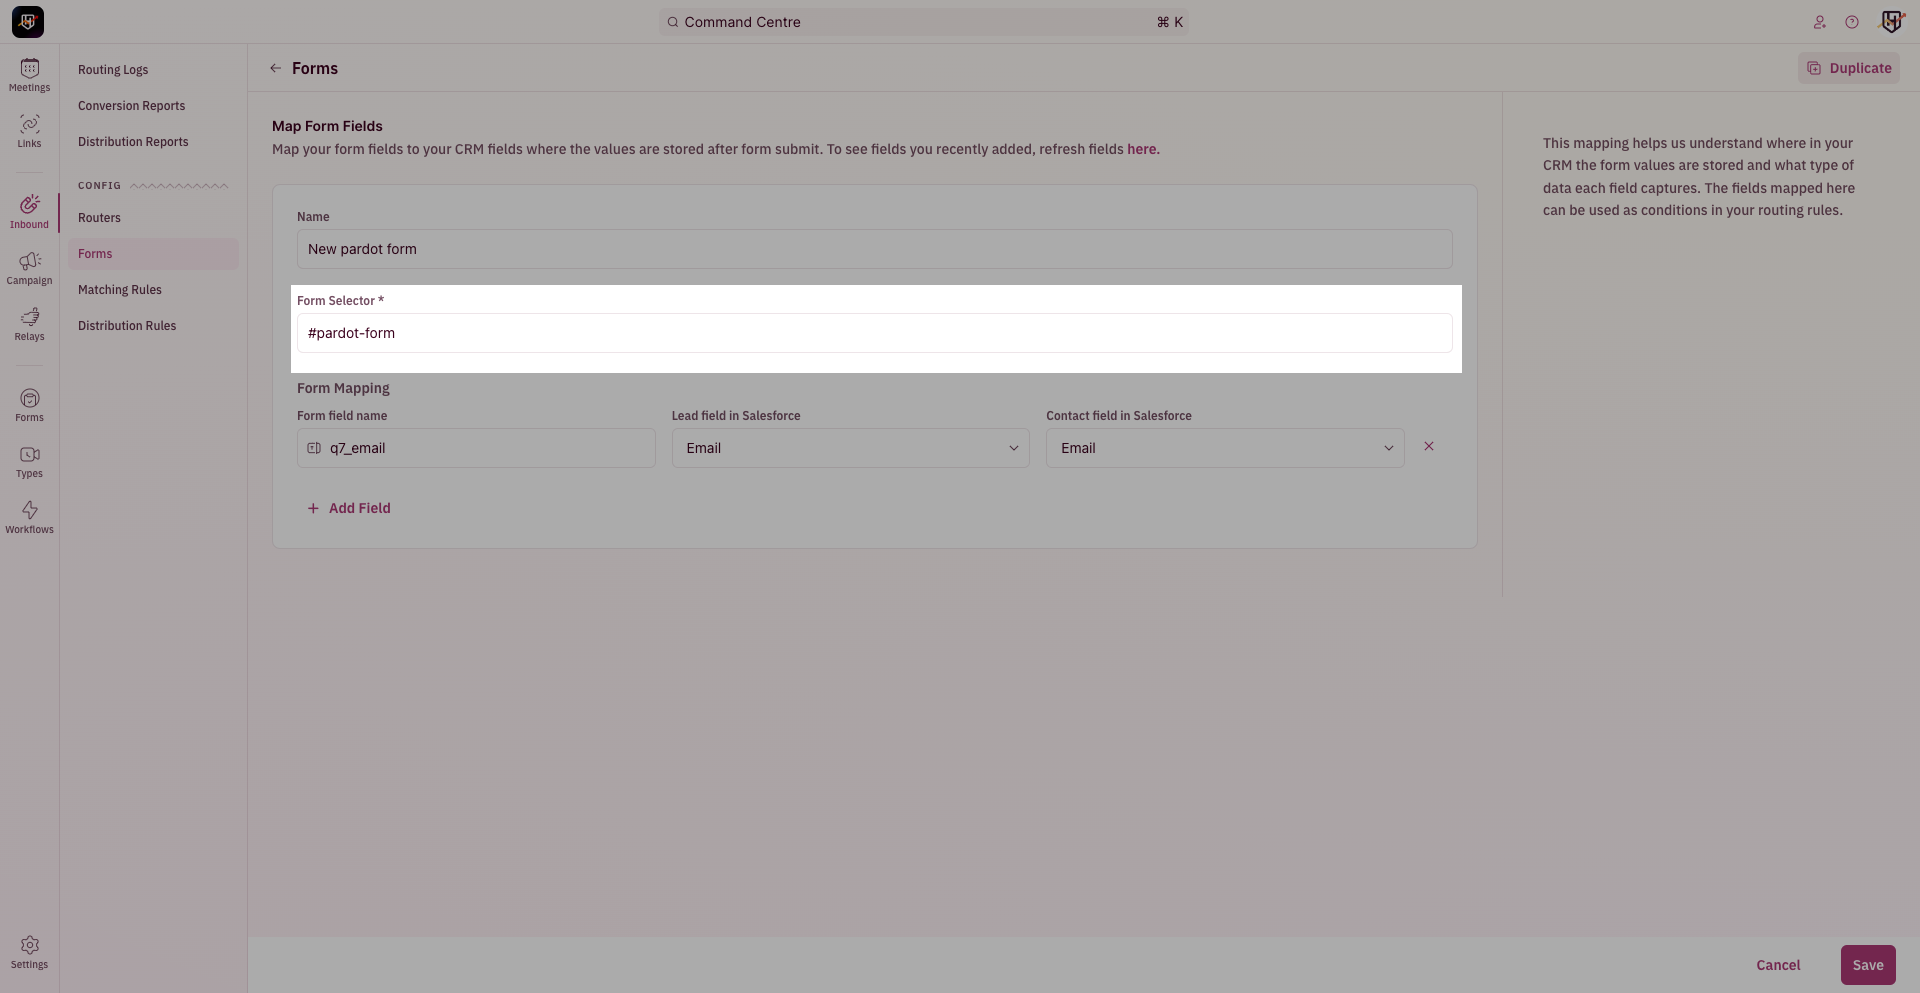
    2. Choose `#pardot-form` as the form selector when [mapping your web form fields](/routers/inbound/mapping-your-form).

    <Frame>
      <img src="https://mintcdn.com/revenuehero/JWjnRwftbF28IN_2/images/pardot_1.png?fit=max&auto=format&n=JWjnRwftbF28IN_2&q=85&s=c653c470e94412abdde72c995e907627" alt="Map Pardot form" width="1920" height="993" data-path="images/pardot_1.png" />
    </Frame>

    **In Salesforce**:

    1. In Salesforce, navigate to **Account Engagement** from the switcher.
           <Frame>
             <img src="https://mintcdn.com/revenuehero/JWjnRwftbF28IN_2/images/pardot_2.png?fit=max&auto=format&n=JWjnRwftbF28IN_2&q=85&s=9355b229954ceb108a8dd96e7f4b00a8" alt="Account Engagement" width="2880" height="1006" data-path="images/pardot_2.png" />
           </Frame>
    2. Navigate to **Forms** by clicking on **Content** tab -> **Forms**
           <Frame>
             <img src="https://mintcdn.com/revenuehero/JWjnRwftbF28IN_2/images/pardot_3.png?fit=max&auto=format&n=JWjnRwftbF28IN_2&q=85&s=93158acff9172706cddcc465bf3303ae" alt="Content navigation" width="2880" height="1044" data-path="images/pardot_3.png" />
           </Frame>
    3. Choose the form that should trigger scheduler, and click **Edit Form**
           <Frame>
             <img src="https://mintcdn.com/revenuehero/JWjnRwftbF28IN_2/images/pardot_4.png?fit=max&auto=format&n=JWjnRwftbF28IN_2&q=85&s=413a61ad0d006cf5ba0fdbac0aef4154" alt="Edit Pardot form" width="2880" height="868" data-path="images/pardot_4.png" />
           </Frame>
    4. Navigate to **Step 4 - Completion Actions**, and choose **Thank you content** tab.
           <Frame>
             <img src="https://mintcdn.com/revenuehero/JWjnRwftbF28IN_2/images/pardot_5.png?fit=max&auto=format&n=JWjnRwftbF28IN_2&q=85&s=63a5d16d59cb490589334b01adf0f766" alt="Thank you content page navigation" width="2880" height="906" data-path="images/pardot_5.png" />
           </Frame>
    5. Click on the **Script icon** in the editor and add the source script tag alone.
           <Frame>
             <img src="https://mintcdn.com/revenuehero/JWjnRwftbF28IN_2/images/pardot_6.gif?s=c4bd5c6f011471a5b70ef9a9c178f7f1" alt="Thank you content page - RH script" width="1152" height="648" data-path="images/pardot_6.gif" />
           </Frame>

    ```javascript RevenueHero source script theme={null}
    <script type="text/javascript" src="https://assets.revenuehero.io/scheduler.min.js"></script>
    ```

    6. Scroll down and click on **Confirm & Save** to persist changes.
           <Frame>
             <img src="https://mintcdn.com/revenuehero/JWjnRwftbF28IN_2/images/pardot_7.png?fit=max&auto=format&n=JWjnRwftbF28IN_2&q=85&s=74502876e95dab24935efe74106dc891" alt="Save Thank you content page" width="2880" height="1352" data-path="images/pardot_7.png" />
           </Frame>

    7. Navigate to **Landing Pages**, choose the landing page where widget should be displayed, and click **Edit landing page**
           <Frame>
             <img src="https://mintcdn.com/revenuehero/JWjnRwftbF28IN_2/images/pardot_8.png?fit=max&auto=format&n=JWjnRwftbF28IN_2&q=85&s=efda58f70b72b978b9dacbea1328b753" alt="Landing Page navigation" width="2880" height="818" data-path="images/pardot_8.png" />
           </Frame>

    8. Navigate to **Step 4 - Landing Page Content**
           <Frame>
             <img src="https://mintcdn.com/revenuehero/JWjnRwftbF28IN_2/images/pardot_9.png?fit=max&auto=format&n=JWjnRwftbF28IN_2&q=85&s=68d9774c37dd9ec9c26126968016a565" alt="Landing Page content navigation" width="2880" height="748" data-path="images/pardot_9.png" />
           </Frame>

    9. Click on script icon, and add full RevenueHero widget installation script
           <Frame>
             <img src="https://mintcdn.com/revenuehero/JWjnRwftbF28IN_2/images/pardot_10.gif?s=ba6e3ce96783421cfdd40caf6eeb5bd3" alt="Landing content page - RH script" width="1152" height="648" data-path="images/pardot_10.gif" />
           </Frame>

    <Note> The script below depicts the native RevenueHero widget installation script for Pardot forms. If you're copying the snippet below, all you need to do is add your router ID to the snippet. </Note>

    ```javascript RevenueHero widget installation script example theme={null}
    <script type="text/javascript" src="https://assets.revenuehero.io/scheduler.min.js"></script>
    <script type="text/javascript">
     window.hero = new RevenueHero({ routerId: '', formType:'pardot' }) //Replace your router ID here.
     hero.schedule('#pardot-form')
    </script>
    ```

    10. Scroll down and click on **Confirm & Save** to persist changes
            <Frame>
              <img src="https://mintcdn.com/revenuehero/JWjnRwftbF28IN_2/images/pardot_11.png?fit=max&auto=format&n=JWjnRwftbF28IN_2&q=85&s=5898a943938bb76c88ba791aec7a151f" alt="Save Landing content page" width="2880" height="1408" data-path="images/pardot_11.png" />
            </Frame>

    <br />

    Open you landing page in a new tab and submit the form to see the scheduler in action. And, that's it! 🎉🎉
  </Tab>

  <Tab title="Iframe Pardot form installation">
    These steps help setup the RevenueHero scheduler for a Pardot form embedded in a custom web page outside of Salesforce.

    1. In Salesforce, navigate to **Account Engagement** from the switcher.
           <Frame>
             <img src="https://mintcdn.com/revenuehero/JWjnRwftbF28IN_2/images/pardot_2.png?fit=max&auto=format&n=JWjnRwftbF28IN_2&q=85&s=9355b229954ceb108a8dd96e7f4b00a8" alt="Account Engagement" width="2880" height="1006" data-path="images/pardot_2.png" />
           </Frame>
    2. Navigate to **Forms** by clicking on **Content** tab -> **Forms**
           <Frame>
             <img src="https://mintcdn.com/revenuehero/JWjnRwftbF28IN_2/images/pardot_3.png?fit=max&auto=format&n=JWjnRwftbF28IN_2&q=85&s=93158acff9172706cddcc465bf3303ae" alt="Content navigation" width="2880" height="1044" data-path="images/pardot_3.png" />
           </Frame>
    3. Choose the form that should trigger scheduler, and click **Edit Form**
           <Frame>
             <img src="https://mintcdn.com/revenuehero/JWjnRwftbF28IN_2/images/pardot_4.png?fit=max&auto=format&n=JWjnRwftbF28IN_2&q=85&s=413a61ad0d006cf5ba0fdbac0aef4154" alt="Edit Pardot form" width="2880" height="868" data-path="images/pardot_4.png" />
           </Frame>
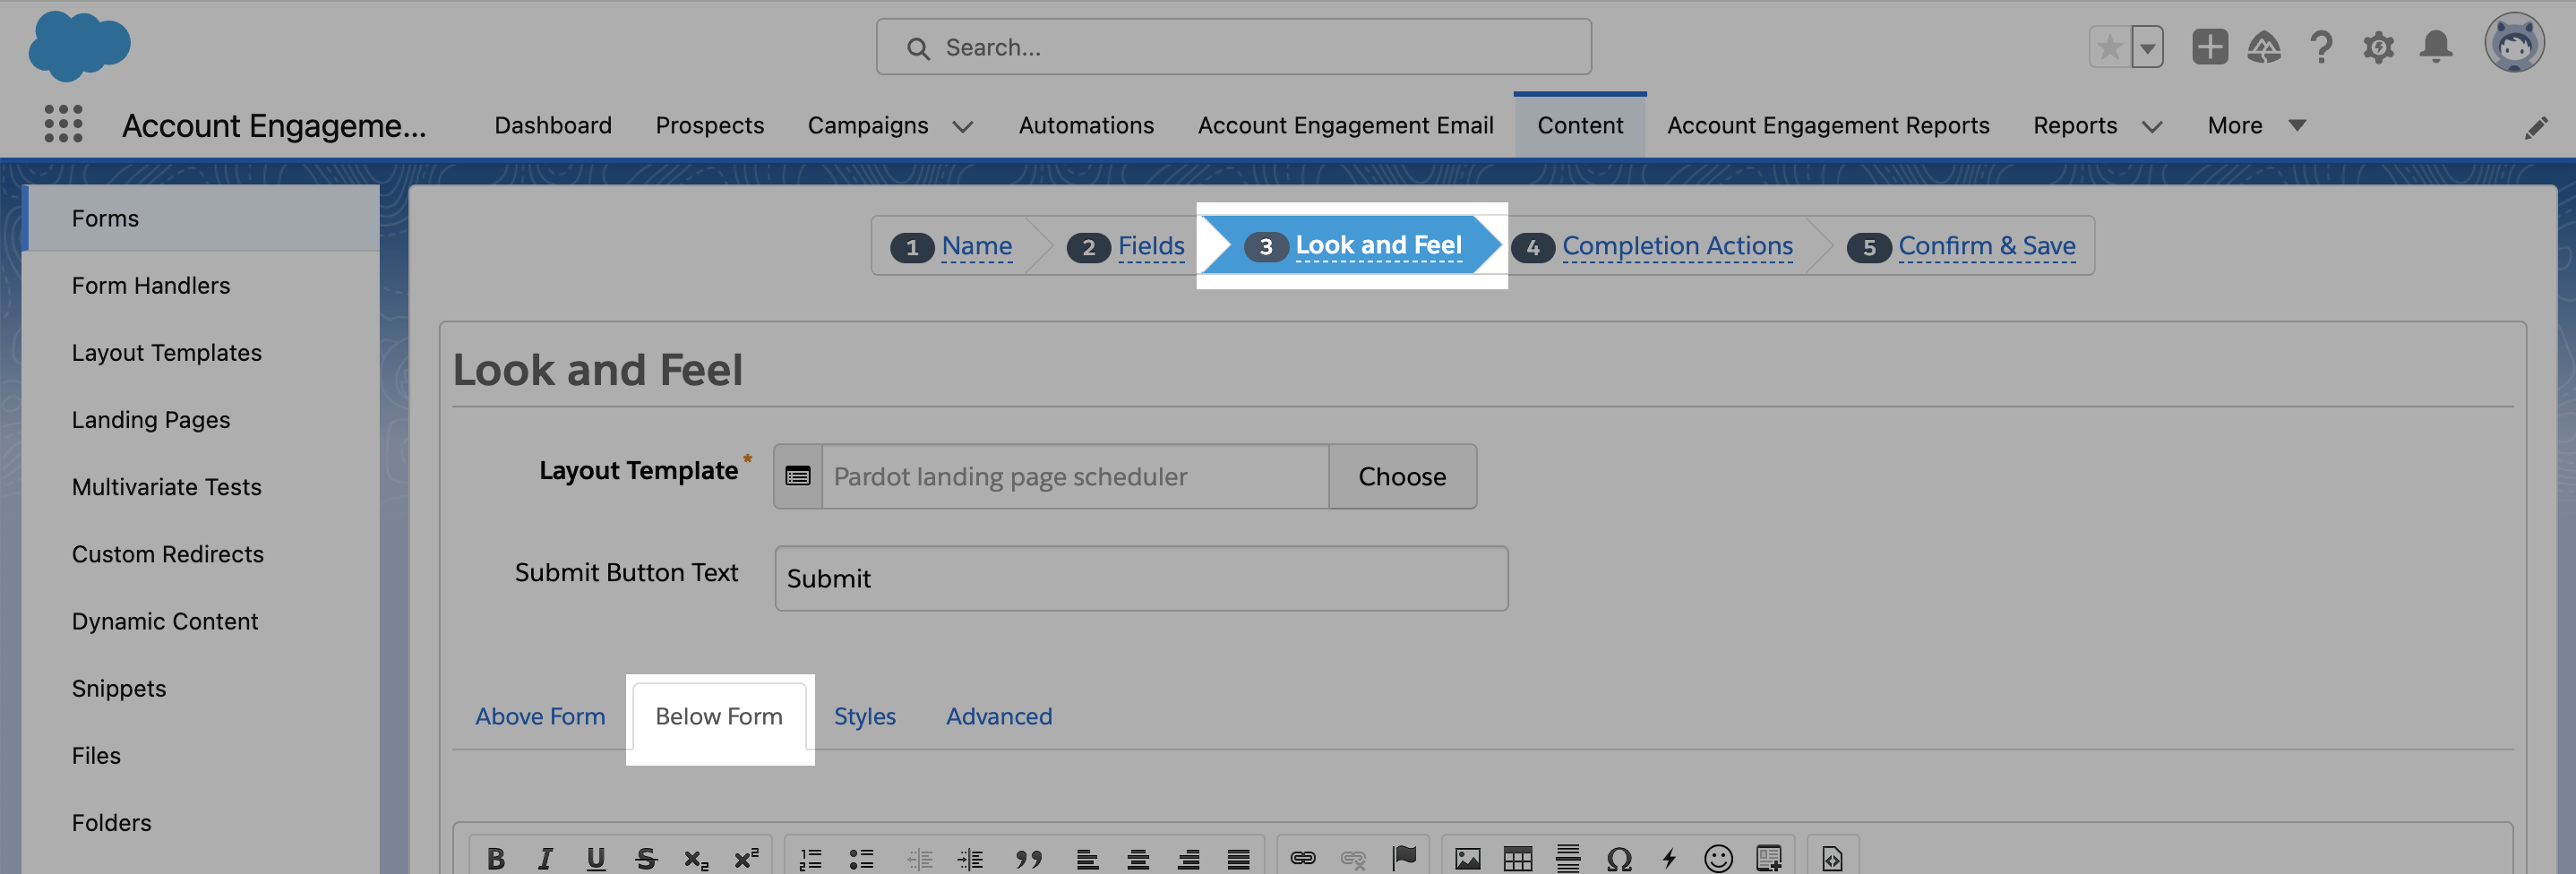
    4. Navigate to **Step 3 - Look and Feel**, and choose **Below Form** tab.
           <Frame>
             <img src="https://mintcdn.com/revenuehero/JWjnRwftbF28IN_2/images/pardot_12.png?fit=max&auto=format&n=JWjnRwftbF28IN_2&q=85&s=38fc7a2f11e5ba035eb51cf3f351e69b" alt="Look and Feel page" width="2876" height="976" data-path="images/pardot_12.png" />
           </Frame>
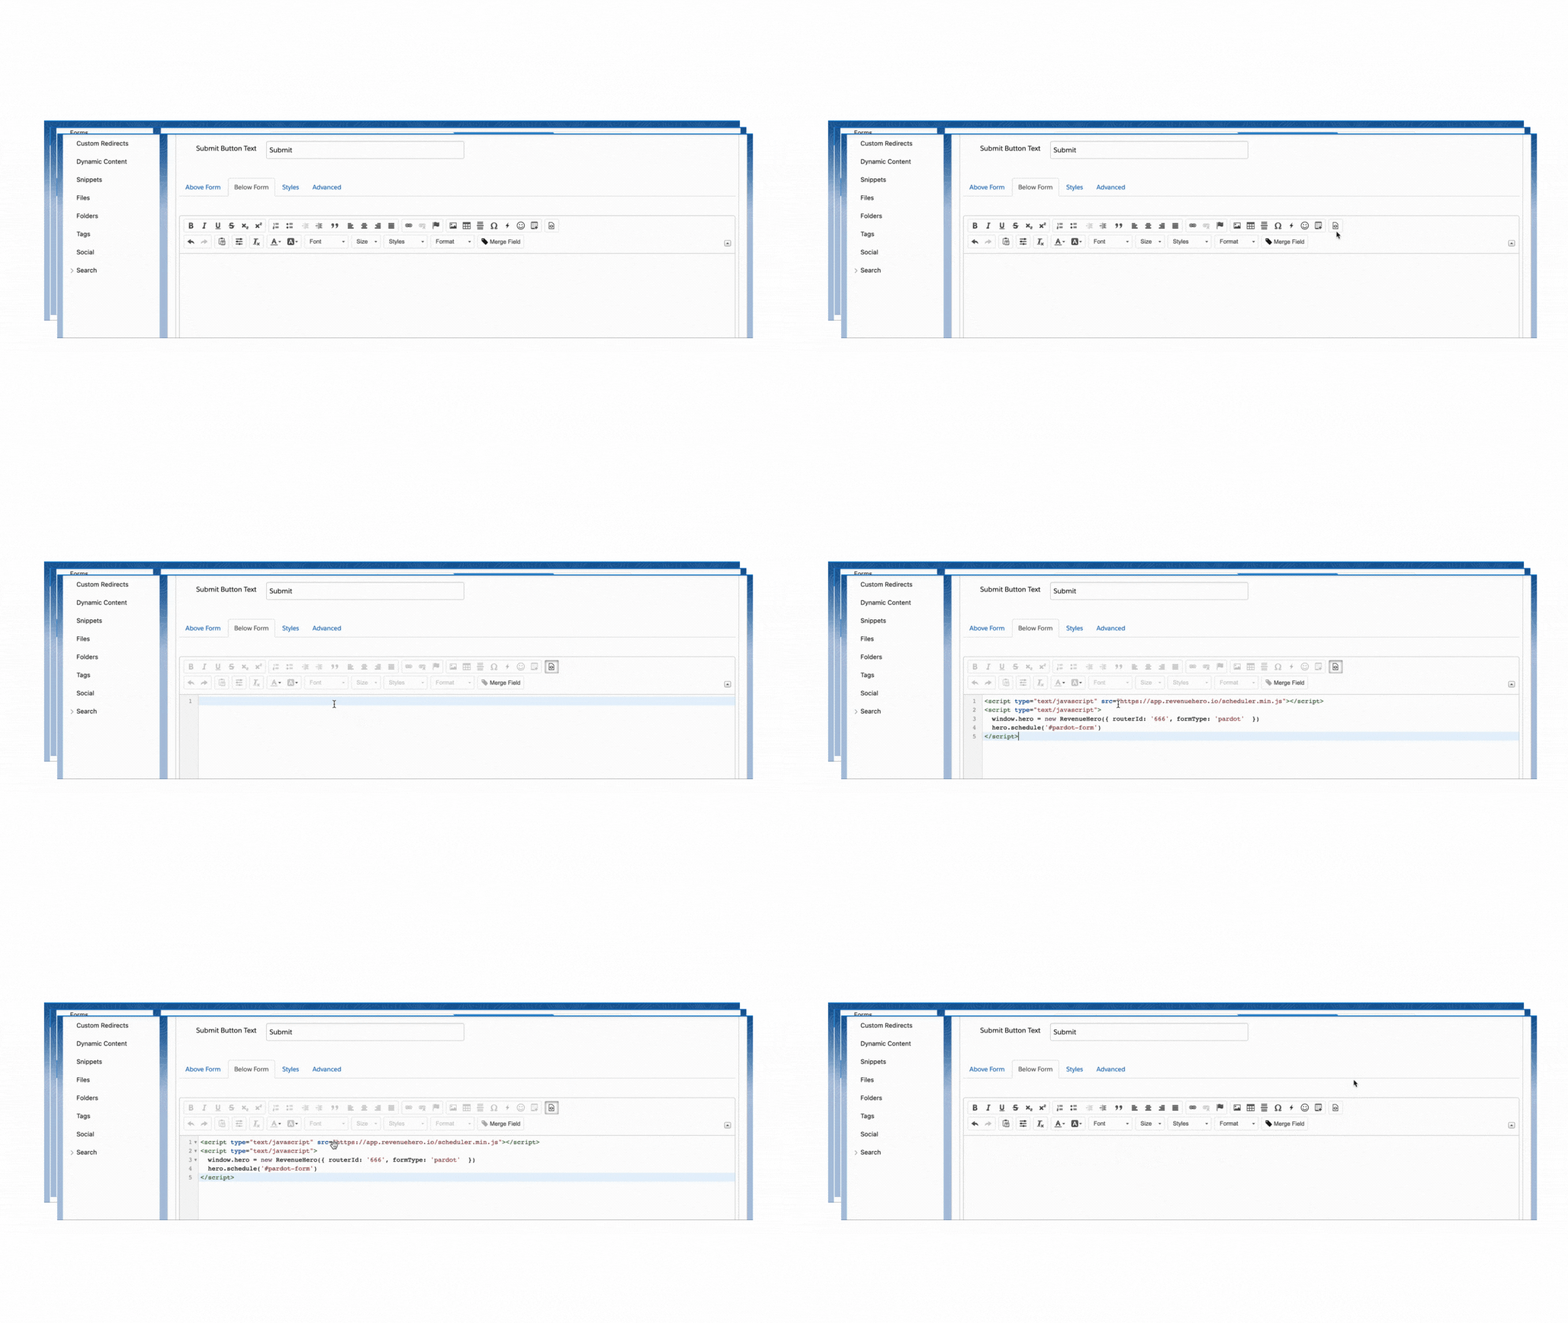
    5. Click on the **Script icon** in the editor and add full RevenueHero widget installation script
           <Frame>
             <img src="https://mintcdn.com/revenuehero/JWjnRwftbF28IN_2/images/pardot_13.gif?s=ba43f8681e3f2c93a331fa690cd3dc32" alt="Look and Feel page - RH script" width="1152" height="648" data-path="images/pardot_13.gif" />
           </Frame>

    ```javascript RevenueHero widget installation script example theme={null}
    <script type="text/javascript" src="https://assets.revenuehero.io/scheduler.min.js"></script>
    <script type="text/javascript">
    window.hero = new RevenueHero({ routerId: '', formType:'pardot' }) //Replace your router ID here.
    hero.schedule('#pardot-form')
    </script>
    ```

    5. Navigate to **Step 4 - Completion Actions**, and choose **Thank you content** tab.
           <Frame>
             <img src="https://mintcdn.com/revenuehero/JWjnRwftbF28IN_2/images/pardot_5.png?fit=max&auto=format&n=JWjnRwftbF28IN_2&q=85&s=63a5d16d59cb490589334b01adf0f766" alt="Thank you content page navigation" width="2880" height="906" data-path="images/pardot_5.png" />
           </Frame>
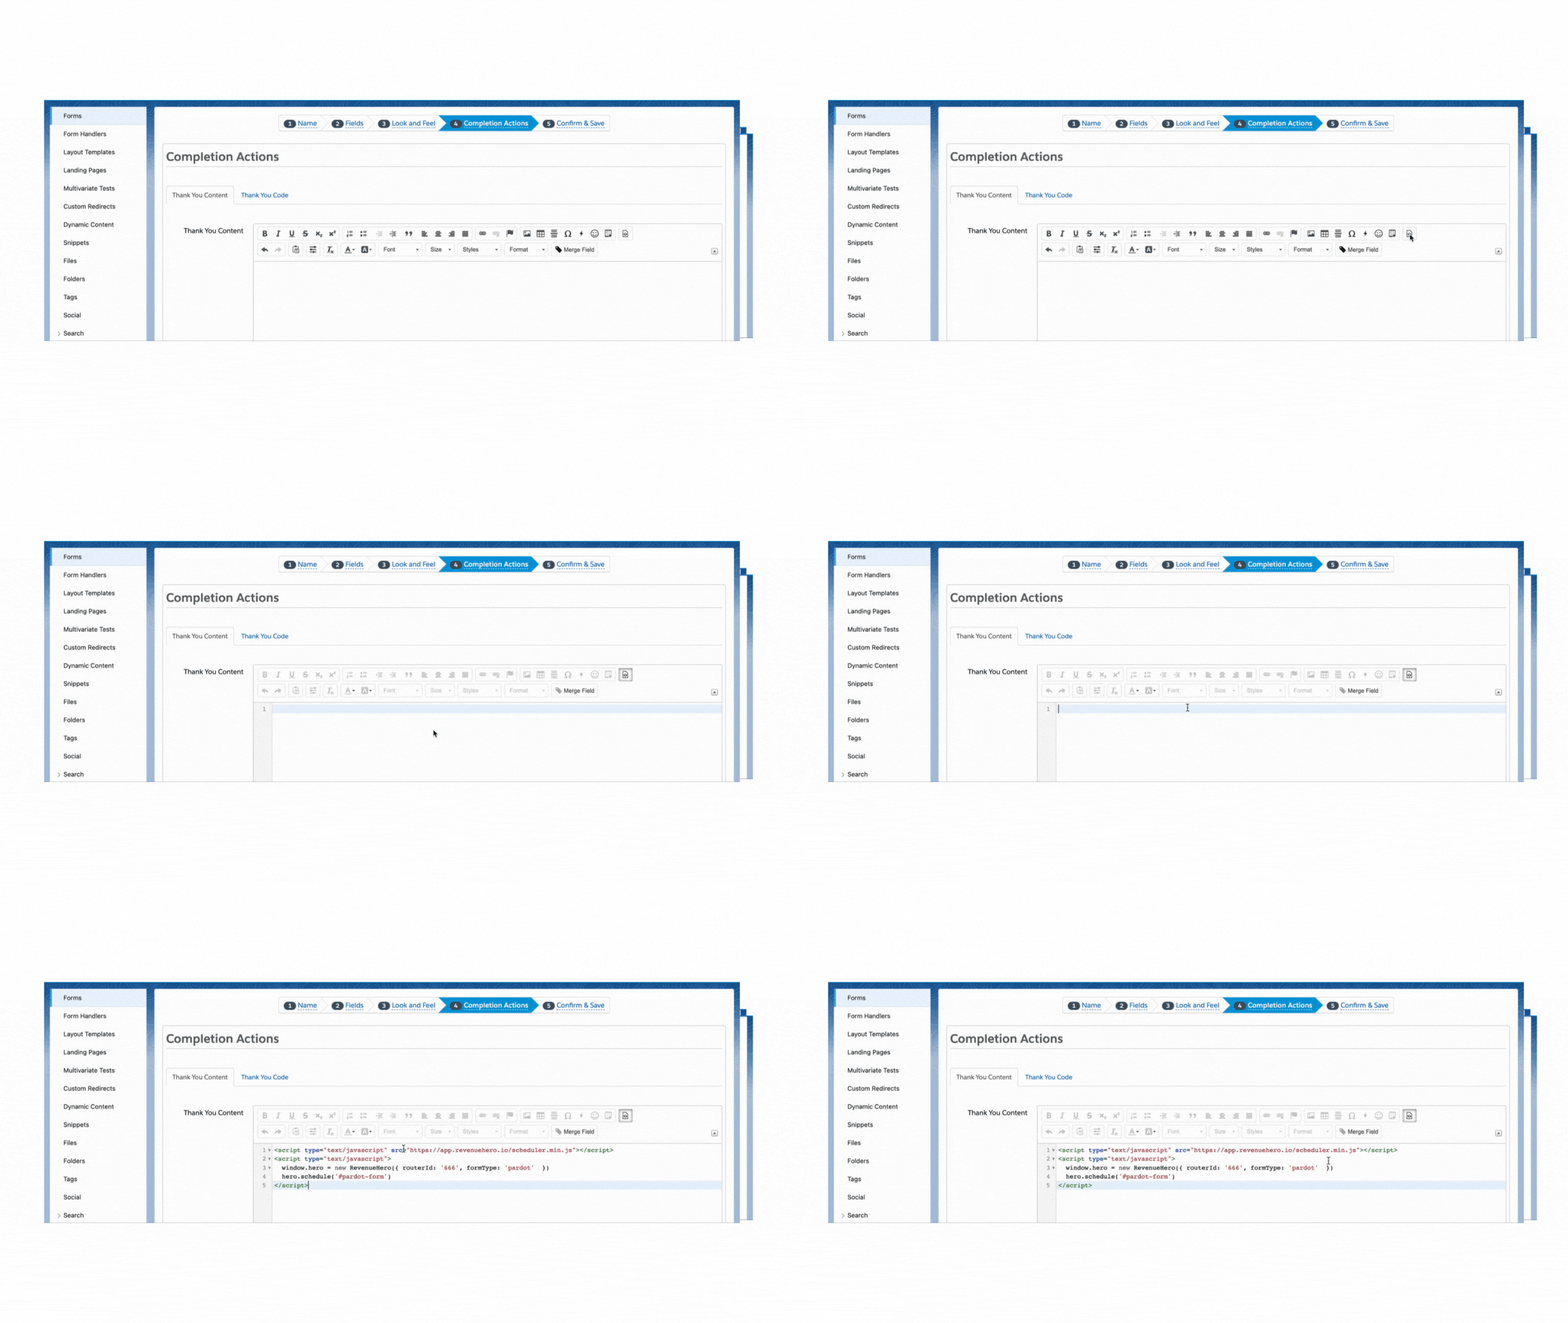
    6. Click on the **Script icon** in the editor and add full RevenueHero widget installation script
           <Frame>
             <img src="https://mintcdn.com/revenuehero/JWjnRwftbF28IN_2/images/pardot_14.gif?s=1054c4109ce7c37f6a8faf9130c14624" alt="Look and Feel page - RH script" width="1152" height="648" data-path="images/pardot_14.gif" />
           </Frame>

    ```javascript RevenueHero widget installation script example theme={null}
    <script type="text/javascript" src="https://assets.revenuehero.io/scheduler.min.js"></script>
    <script type="text/javascript">
     window.hero = new RevenueHero({ routerId: '', formType:'pardot' }) //Replace your router ID here.
     hero.schedule('#pardot-form')
    </script>
    ```

    7. Scroll down and click on **Confirm & Save** to persist changes
           <Frame>
             <img src="https://mintcdn.com/revenuehero/JWjnRwftbF28IN_2/images/pardot_7.png?fit=max&auto=format&n=JWjnRwftbF28IN_2&q=85&s=74502876e95dab24935efe74106dc891" alt="Save Landing content page" width="2880" height="1352" data-path="images/pardot_7.png" />
           </Frame>
    8. Then add full RevenueHero widget script on the website page that should display the scheduler (this is outside of SF on any CMS/website of choice)

    <br />

    Open you landing page in a new tab and submit the form to see the scheduler in action. And, that's it! 🎉🎉
  </Tab>
</Tabs>
